KB and Scotch - I will write them. Just like you said, nothing to loose.
The surfaces were scraped down to aluminum and prepped with paint thinner and acetone. And scotch - they were NOT polished! haha
The info on the can (in a very fine print) says it's ok to touch after 1 hour, handled after 3 hours, and cures in 7 days. Then, it says it 'must' be heat cured for durability and chemical resistance. When doing off vehicle, bake at 250F for 30 minutes, cool for 30, bake at 400F for 30, cool for 30, bake at 600F for 30, cool 30 minutes.
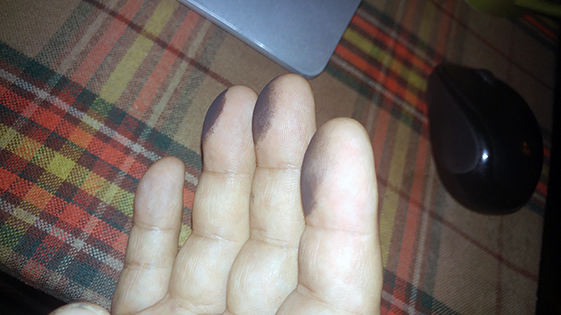
I did my home heater heat treatment, which of course is nothing like doing it in a controlled environment. When handling some more of the block now, as I don't need to be careful around it anymore, there are durable areas which don't scratch. The other areas are just as bad as mentioned before. The last part doesn't go well with the 'safe to touch or handle' after certain time instruction. Check at my fingers in the photo below - I just simply picked it up. That doesn't look to me like 'safe to handle', so there is definitely a reason to write VHT.
I agree with you Scotch. The engine surface definitely doesn't heat up to 250 degrees Celsius! Never mind a 1000. There is so much discussion about a variety of paints and experiences with them, some of them available only in Europe some not in Canada. Quite confusing and in a way left me with a feeling that I've learnt nothing. Now, after this 'experiment', I think the middle road might be best for me. I wouldn't paint the cylinder head with the same paint as I would a park bench, but real life can be stranger than fiction.
My adventurous logic was trying to tell me this: well, if 500F is durable then 2000 must be even more! Those areas which seem to be cured look very nice and exactly what I was looking for. Unfortunately, I am not equipped to do it properly. Using kitchen oven is not advisable as heat curing would release gases which would make the oven toxic and not recommended for cooking food.
There is also a paragraph on the spray can about curing it on a vehicle: ride it for 10 minutes, cool for 20, ride for 20, cool, ride for 30. This wouldn't take the engine temperatures, especially crankcase, to 600 Fahrenheit as written in off vehicle curing instructions. I am puzzled.
Summarizing...
I really like the matte (flat) finish of the VHT paint. It produced the exact black flat finish I was after. Unfortunately, in my opinion, it can only be done properly with a proper heat curing set up. In other words, it's like powder coating not painting. They should have a big warning on the cans stating it. The matte finish VHT is not ready to handle after spraying! I wouldn't use it unless ready to heat cure everything right away and with caution. Given the very high temperatures needed for curing, I am not comfortable with successful touching the paint up in the future. Considering all of the above, for the VHT paint I'd feel comfortable only having the engine cases and all completely disassembled.
Considering the above and the fact that the engine doesn't heat up to such high temperatures (hell, the coolant in a liquid cooled engine is supposed to never go above the boiling point), I don't think such high temperature paint is needed. Especially in my settings, I will stick to those 500F PlastiKote engine enamels. I've used them and had no problem, and they don't mention any curing. I would worry using other 'regular', no matter how durable they feel, paints on the engine.
Still sitting on a fence about the painting scheme. I will still go with black, but not sure if I'd go with matte or gloss. Gloss doesn't really become super shiny unless clear coated. Gloss is easier to wipe, and the matte finish seems to be porous. I am even thinking about experimenting, using a small area, how combining the two would come out.
") Just need to replace the cotter pins after cleaning everything.
Just need to replace the cotter pins after cleaning everything.