
Electrical
AW82-TR1 Coil Upgrade For Z1300 & KZ1300. How To !
- LareNurminen
-

- Offline
- Sustaining Member
-

- Posts: 271
- Thanks: 153
Re: AW82-TR1 Coil Upgrade For Z1300 & KZ1300. How To !
9 years 3 months ago
1981 igniter is reproduced by us, available at
www.kawasaki1300parts.com
If you modify the ignition by removing the resistor cube and changing the coils, make sure that the primary side ohm rating is 2,5 ohms or higher. Lower ohm rating on the primary side will burn the transistors of the igniter!
We are also working on prototypes of reproduction Hall sensors for the -81 ignition system, will keep you informed on progress.
Please Log in or Create an account to join the conversation.
- Neville
-

- Offline
- Sustaining Member
-
- Posts: 90
- Thanks: 78
Re: AW82-TR1 Coil Upgrade For Z1300 & KZ1300. How To !
8 years 8 months ago
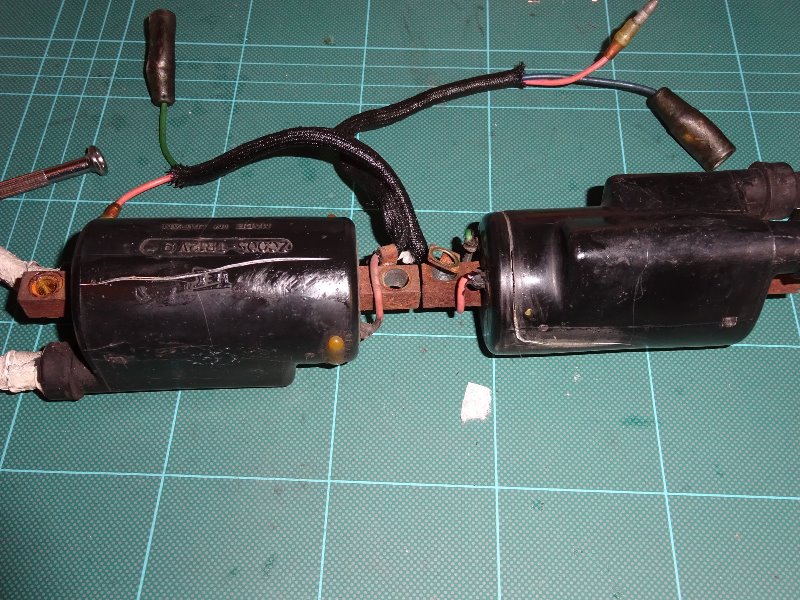
This thread has been very helpful in my own efforts to sort out my ignition system. My 79 A1 had developed some fairly severe cracks in the coil cases and was occasionally difficult to restart when hot. It was also very sensitive to the cleanliness of the spark plugs – with new plugs in would run fine but idle quality and part load running were not as crisp as they should be after 500 miles or so.
Having read through various threads on this site, I decided to avoid used coils (no guarantee they were any better quality than my originals). After confirming with MCG in Germany that their replacement coils were 2.4 to 2.6 Ohms, I ordered a set but when received these all indicated 2.2 Ohms (see pic).
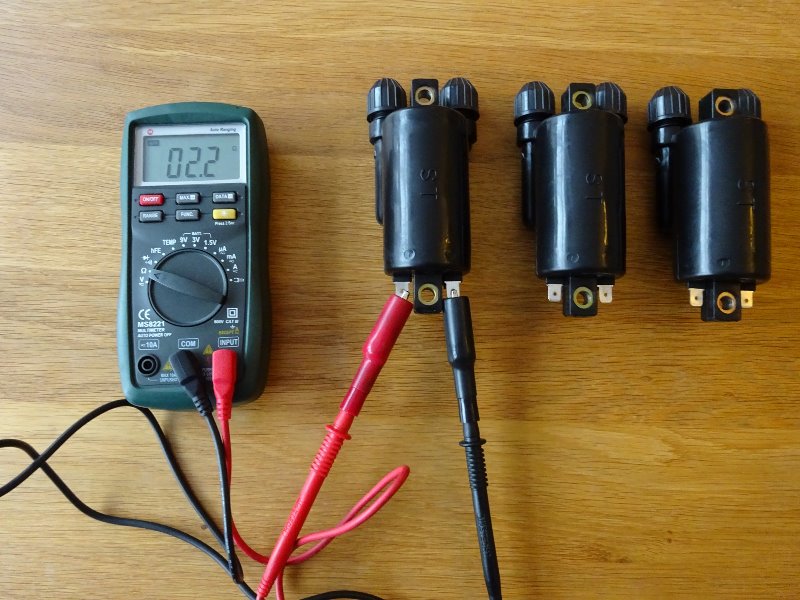
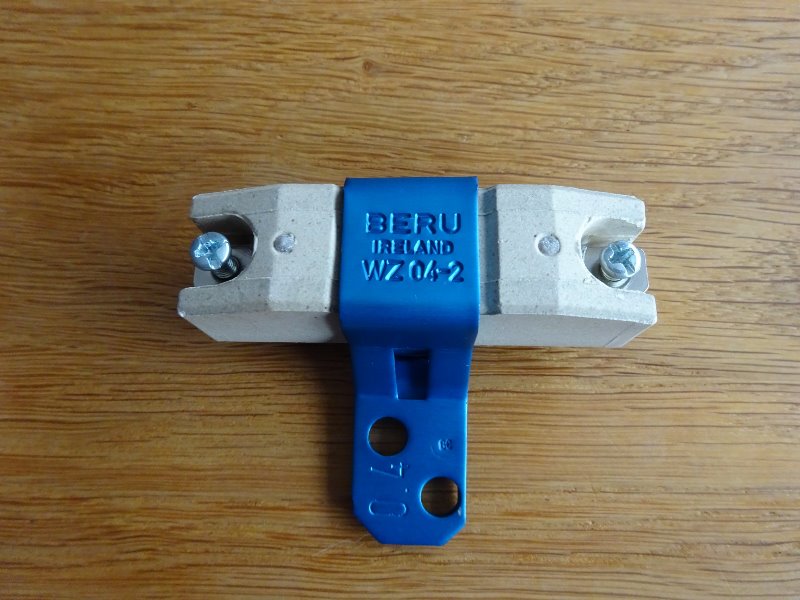
MCG said I should fit them anyway and they have sold many without issues. To be fair, the specs for the coils usually specify a +/- 10-12% variability in resistance so even at 2.2 Ohms they are theoretically still in spec for a 2.5 Ohm nominal resistance. However, having some respect for my ageing ignition unit, I sourced some 0.4 Ohm ballast resistors – these are specified for a number of cars for both ignition and diesel glowplug systems (see pic). These were about $25 each which was a little disappointing but I could not find anything else.
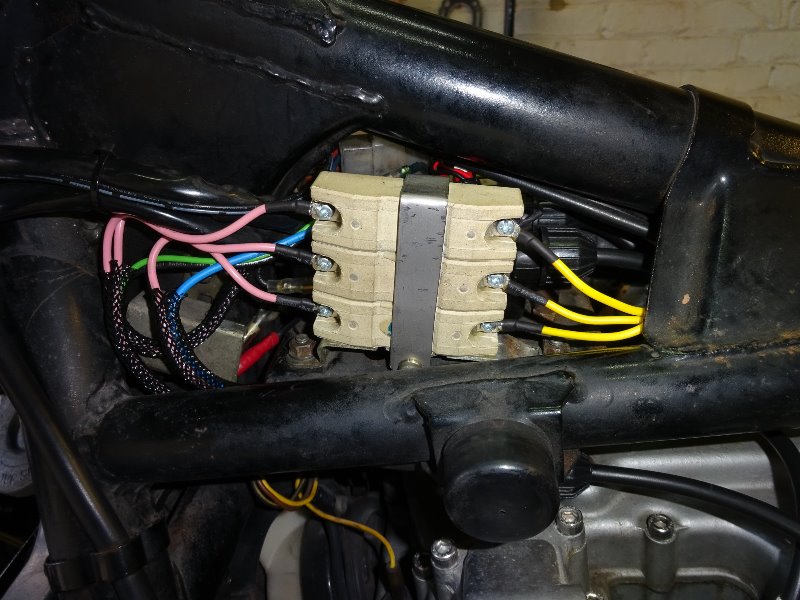
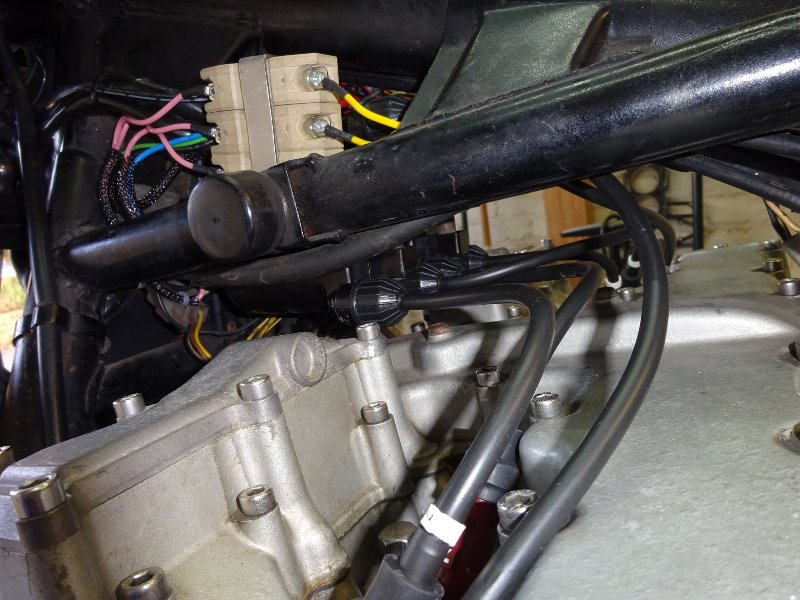
The next challenge was to fit these to the frame – combined together, they are larger than the stock ballast resistor. I used the original mounting bracket but slightly modified this to angle it down at the rear to increase clearance between the resistor bank and the tank. I also made up a stainless strap to hold them in place. I checked clearance with the "plastigauge" approach with some bluetack - its around 10-15mm which should be fine.
Wiring was relatively straightforward and the new coils, despite being slightly wider where the HT leads connect, bolt in place of the originals without modification
My A1 now runs extremely smoothly with a better idle quality and very crisp part load pick up even with “old” plugs. Hot start now also very reliable – always on first crank with just a touch of the start button. Hope this is helpful
Having read through various threads on this site, I decided to avoid used coils (no guarantee they were any better quality than my originals). After confirming with MCG in Germany that their replacement coils were 2.4 to 2.6 Ohms, I ordered a set but when received these all indicated 2.2 Ohms (see pic).
MCG said I should fit them anyway and they have sold many without issues. To be fair, the specs for the coils usually specify a +/- 10-12% variability in resistance so even at 2.2 Ohms they are theoretically still in spec for a 2.5 Ohm nominal resistance. However, having some respect for my ageing ignition unit, I sourced some 0.4 Ohm ballast resistors – these are specified for a number of cars for both ignition and diesel glowplug systems (see pic). These were about $25 each which was a little disappointing but I could not find anything else.
The next challenge was to fit these to the frame – combined together, they are larger than the stock ballast resistor. I used the original mounting bracket but slightly modified this to angle it down at the rear to increase clearance between the resistor bank and the tank. I also made up a stainless strap to hold them in place. I checked clearance with the "plastigauge" approach with some bluetack - its around 10-15mm which should be fine.
Wiring was relatively straightforward and the new coils, despite being slightly wider where the HT leads connect, bolt in place of the originals without modification
My A1 now runs extremely smoothly with a better idle quality and very crisp part load pick up even with “old” plugs. Hot start now also very reliable – always on first crank with just a touch of the start button. Hope this is helpful
Please Log in or Create an account to join the conversation.
- scotch
-

- Offline
- Sustaining Member
-
- Posts: 2046
- Thanks: 945
Re: AW82-TR1 Coil Upgrade For Z1300 & KZ1300. How To !
8 years 8 months ago
Nice neat wiring job Neville !
1980 KZ 1300 sr# KZT30A-009997
Always High - Know Fear !
Always High - Know Fear !
The following user(s) said Thank You: Neville
Please Log in or Create an account to join the conversation.
- Kawboy
-

- Offline
- Sustaining Member
-
- Posts: 3259
- Thanks: 1206
Re: AW82-TR1 Coil Upgrade For Z1300 & KZ1300. How To !
8 years 8 months ago
You're one step ahead of me Neville. I bought the same aw82's and also the (in my case) .5 ohm resistors and they are Beru's. They do generate a fair amount of heat, so beware regarding the mounting position. I've pulled ballast resistors off of Chryslers back in the 70's and burnt my fingers. Frigging hot. The mechanic who worked in the next bay said" Why do you think the resistor is mounted in a ceramic base for??" They're just like the old stove elements back in the 1940's and 50's.
Please Log in or Create an account to join the conversation.
- Neville
-
- Offline
- Sustaining Member
-
- Posts: 90
- Thanks: 78
Re: AW82-TR1 Coil Upgrade For Z1300 & KZ1300. How To !
8 years 8 months ago
Good point Kawboy, these ballast resistors need to dissipate a good deal of heat. I carried out some simple calculations before the conversion to ensure it would all be manageable. The original ballast resistor is 1.7 Ohms and when connected in series to the 1.5 Ohm coils, draws about 4.4 Amps at 14 Volts. This means that the 1.7 Ohm ballast resistor has to dissipate around 32 Watts for each coil, so close to 100 Watts in total for the resistor block. With my new set up and 0.4 Ohm resistors, each resistor only has to dissipate around 12 Watts - around 36 Watts in total.
Interesting to note the increase in power delivered to the new coils - original coils see around 30 watts whereas the new coils (primarily due to the higher voltage across them) now see around 64 watts each - twice as high as the originals. I know this is a simplistic analysis as I have ignored the dynamics of the circuit and the inductance but I think it is reasonable as a basic assumption - happy for anyone to correct me if I got it wrong - see calculation table below

Interesting to note the increase in power delivered to the new coils - original coils see around 30 watts whereas the new coils (primarily due to the higher voltage across them) now see around 64 watts each - twice as high as the originals. I know this is a simplistic analysis as I have ignored the dynamics of the circuit and the inductance but I think it is reasonable as a basic assumption - happy for anyone to correct me if I got it wrong - see calculation table below
Please Log in or Create an account to join the conversation.
- Kawboy
-
- Offline
- Sustaining Member
-
- Posts: 3259
- Thanks: 1206
Re: AW82-TR1 Coil Upgrade For Z1300 & KZ1300. How To !
8 years 8 months ago
You put a smile on my face this morning Neville. You made the calculations and determined that the heat generated would be 32 watts and concluded that you could safely mount the ballast resistors where you did. Kudos to you. Now we just need to see if it all works out as you thought. Keep an eye on the heat generated and let us know please. I believe your calculations are correct regarding the heat generated. I too will be building a mounting bracket but plan on incorporating stand offs to allow air flow around the entire ballast. I'm probably gun shy from the Chrysler ballasts. Half the problem with them was probably the under the bonnet temperatures up on the firewall behind the engine.
The following user(s) said Thank You: Neville
Please Log in or Create an account to join the conversation.
Moderators: scotch
Time to create page: 0.176 seconds