
Kawboy's restoration/conversion of a 1980 KZ13
- Frank833
-

- Offline
- Elite Member
-

- Posts: 192
- Thanks: 55
Re: Kawboy's restoration/conversion of a 1980 KZ13
7 years 3 months agoKawboy wrote: ... to ask questions to which anyone in the camshaft grinding business should be able to answer...
You should come to Performance Racing Industry Show this week in Indy. Sort of a "Racing Only" version of SEMA. Lots of vendors actually send their Engineers to the show as attendees are race car builders/owners/drivers and don't put up with the marketing types very well.
I'll be there Thur-Sat.
The following user(s) said Thank You: Kawboy
Please Log in or Create an account to join the conversation.
- Frank833
-
- Offline
- Elite Member
-
- Posts: 192
- Thanks: 55
Re: Kawboy's restoration/conversion of a 1980 KZ13
7 years 3 months ago
I assume that 1.44 is actually a 29mm seat (1.42)? KPMI has seats 29mm x 9.5mm (.375) in Nickle and Powdered metal. They are in their catalog at KPMI.us, KPMI is the goto place for a lot of bike valve train parts.
They also have springs, guides, seals if you need them.
I did go with their springs in-case I do cams later.
If you decide to go with those, you may want to shop around. I ordered them cheaper through online shops rather than direct.
BTW, KPMI quoted me $90.55/each for custom exhaust valves, but said they'd do them "considerably" cheaper if I'd do a quantity of 50 or 100.
The following user(s) said Thank You: Kawboy
Please Log in or Create an account to join the conversation.
- Kawboy
-
 Topic Author
- Offline
- Sustaining Member
-

- Posts: 3212
- Thanks: 1178
Re: Kawboy's restoration/conversion of a 1980 KZ13
7 years 3 months ago - 7 years 3 months ago
Thanks for the info Frank. I've sent a request to KPMI for actual seat OD's to see if the interference is correct.
(1.142" works out to 29mm)
The 1.440" id of the counter bore that I measured works out to 36.57 mm. 36.5 mm is 1.437" which is exactly 1-7/16". Now I did measure this with inside mic which is not the best way to take the measurement but it's what I have to work with here. I might be out .001-.002" but no more than that. It's all in the feel and I'm pretty good at it.
Off to the garage to pull some more inserts. In for a penny, in for a pound they say.
Last edit: 7 years 3 months ago by Kawboy.
Please Log in or Create an account to join the conversation.
- Frank833
-
- Offline
- Elite Member
-
- Posts: 192
- Thanks: 55
Re: Kawboy's restoration/conversion of a 1980 KZ13
7 years 3 months ago
Don't know how I got from 1.44 to 1.142.. Guess I had a brain fart. But as you see they have all the standard metric sizes.
I wonder if they wont drop you a sample in the mail?
Or, they will be at PRI at the end of the week. If you ask them to bring a sample to PRI, I will pick it up and drop it in the mail to you from Indy.
I'd personally rather have one in hand to check myself since I assume you are trying to avoid machining.
The following user(s) said Thank You: Kawboy
Please Log in or Create an account to join the conversation.
- Kawboy
-
Topic Author
- Offline
- Sustaining Member
-
- Posts: 3212
- Thanks: 1178
Re: Kawboy's restoration/conversion of a 1980 KZ13
7 years 3 months ago - 7 years 3 months ago
You're a good man for offering and I appreciate that. We'll see how they respond to the email I dropped them.
In the true spirit of "Learn as you go, Share what you know"
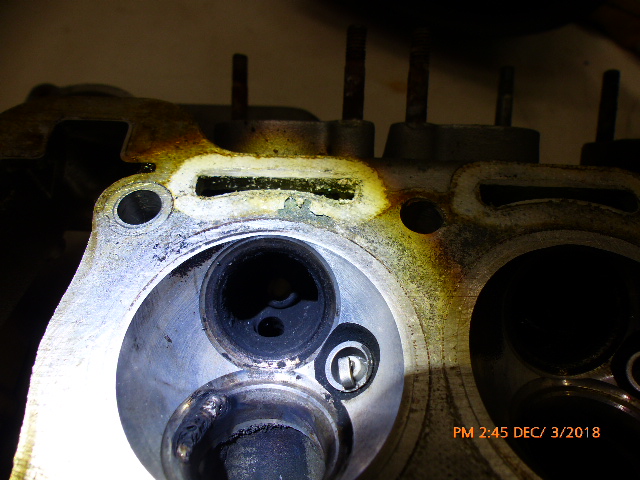
I just pulled out an exhaust insert. Laid a bead of TIG, no filler rod on the full circumference of the seat and before I touched it, I snapped a picture. You can just see the edge of the insert pulled away from the cylinder head. As I was doing this it was obvious that the edge of the seat was away in some areas and not in a couple of other spots, so I hit the tight spots again with the TIG torch until I could see the upper edge pulled away on the full circumference. After it cooled (maybe a minute) I pulled it out with my fingers. Had I turned the head over, I'm sure it would have fallen out. And what was left in the counterbore was a totally unmolested clean as a whip bore which is ready for a new seat without machining.
It really is a blessing to have the equipment to do this kind of work. I love my ThermalArc 180. It's a great machine for light duty around the shop. Capable of AC or DC straight or reversed. Complete with pulse arc if needed. I butt welded a fan shroud which is .025" sheet metal using the pulse and used .035" mig wire for the filler rod. Really cool to be able to do this kind of work.
Shot of my ThermalArc 180. I had it set for 80 amps to lay the bead.

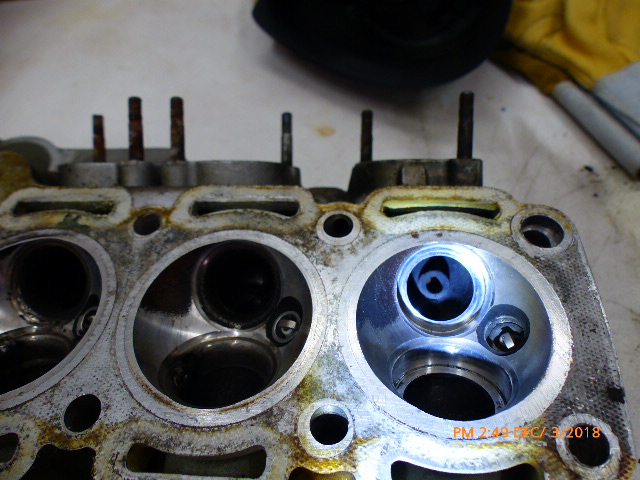
Shot of the #1 cylinder. Intake insert already removed. As I said "Learn as you go". On this one I laid a bead around most of the insert but stayed away from the area where the intake and exhaust inserts meet thinking that the material in the head was a little light in this area and I didn't want to misshape it. The result was that I needed to pry the insert out and in so doing marked up the base of the counterbore slightly. So I have a little cleaning up to do before putting in a new seat.
This time on the exhaust seat, I laid a bead around the entire circumference and the seat just fell out, so this is how I'll proceed.
This picture is of #2 combustion chamber. I had a go at laying a bead on the intake and I must confess that the sputtering and porosity gave me the willies so I stopped and tried #3 intake. Same thing. Once the initial burn off of the impurities, the seat material started to fuse but that initial burn off is like a welder's nightmare.
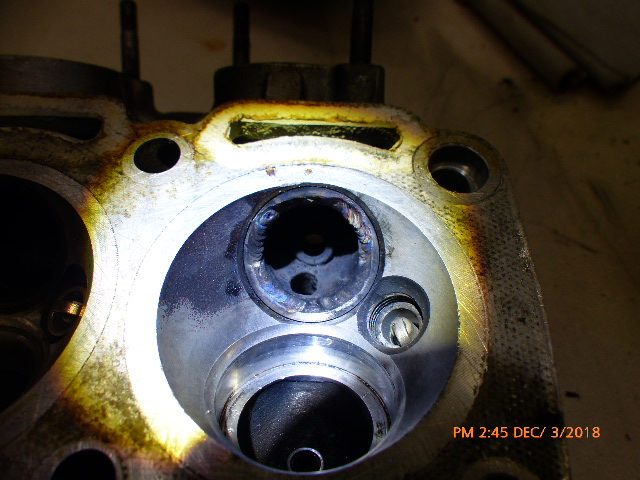
Anyway, the purpose of this pic is to show you what the insert looks like before touching it with the torch. You can't see the insert to chamber edge. The aluminum is polished and the seat is polished. It's almost a guessing game.
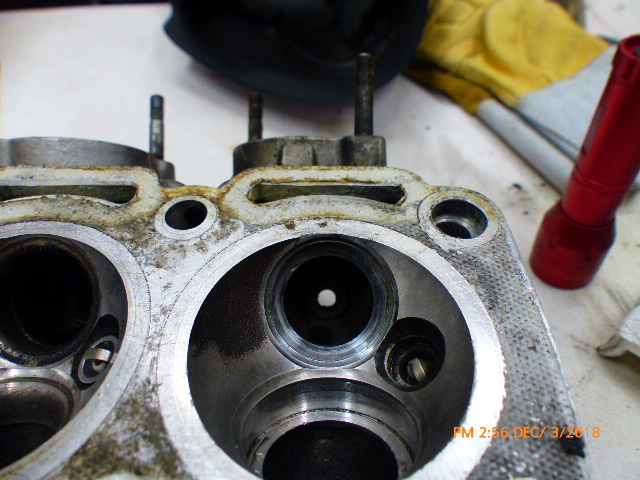
This pic is combustion chamber #1 with both seats out. You can see (hopefully) the nice clean counter bore for the exhaust insert to be placed in.
Same pic as the last one only different lighting. (Don't know which one shows up better.)
In the true spirit of "Learn as you go, Share what you know"
I just pulled out an exhaust insert. Laid a bead of TIG, no filler rod on the full circumference of the seat and before I touched it, I snapped a picture. You can just see the edge of the insert pulled away from the cylinder head. As I was doing this it was obvious that the edge of the seat was away in some areas and not in a couple of other spots, so I hit the tight spots again with the TIG torch until I could see the upper edge pulled away on the full circumference. After it cooled (maybe a minute) I pulled it out with my fingers. Had I turned the head over, I'm sure it would have fallen out. And what was left in the counterbore was a totally unmolested clean as a whip bore which is ready for a new seat without machining.
It really is a blessing to have the equipment to do this kind of work. I love my ThermalArc 180. It's a great machine for light duty around the shop. Capable of AC or DC straight or reversed. Complete with pulse arc if needed. I butt welded a fan shroud which is .025" sheet metal using the pulse and used .035" mig wire for the filler rod. Really cool to be able to do this kind of work.
Shot of my ThermalArc 180. I had it set for 80 amps to lay the bead.
Shot of the #1 cylinder. Intake insert already removed. As I said "Learn as you go". On this one I laid a bead around most of the insert but stayed away from the area where the intake and exhaust inserts meet thinking that the material in the head was a little light in this area and I didn't want to misshape it. The result was that I needed to pry the insert out and in so doing marked up the base of the counterbore slightly. So I have a little cleaning up to do before putting in a new seat.
This time on the exhaust seat, I laid a bead around the entire circumference and the seat just fell out, so this is how I'll proceed.
This picture is of #2 combustion chamber. I had a go at laying a bead on the intake and I must confess that the sputtering and porosity gave me the willies so I stopped and tried #3 intake. Same thing. Once the initial burn off of the impurities, the seat material started to fuse but that initial burn off is like a welder's nightmare.
Anyway, the purpose of this pic is to show you what the insert looks like before touching it with the torch. You can't see the insert to chamber edge. The aluminum is polished and the seat is polished. It's almost a guessing game.
This pic is combustion chamber #1 with both seats out. You can see (hopefully) the nice clean counter bore for the exhaust insert to be placed in.
Same pic as the last one only different lighting. (Don't know which one shows up better.)
Last edit: 7 years 3 months ago by Kawboy.
Please Log in or Create an account to join the conversation.
- Kawboy
-
Topic Author
- Offline
- Sustaining Member
-
- Posts: 3212
- Thanks: 1178
Re: Kawboy's restoration/conversion of a 1980 KZ13
7 years 3 months ago - 7 years 3 months ago
Also meant to record the seat size for the exhaust insert. The counter bore measured at 1.277" (32.43 mm) A 32.5 mm seat would be 1.2795" unless the 32.5 mm seat is actually .005" oversize to give .005" interference which would be about right for an aluminum head and inserts in the 20 - 30 mm range.
The ID of the insert measured up at .945" (24 mm) and the seat height was .355" (9 mm)
Update- Now have #123 exhaust and #1 intake seat out. Takes about 5 minutes a seat. Giddy - up !! And the Damned Argon bottle is almost empty. Oh well. get another bottle tomorrow.
The ID of the insert measured up at .945" (24 mm) and the seat height was .355" (9 mm)
Update- Now have #123 exhaust and #1 intake seat out. Takes about 5 minutes a seat. Giddy - up !! And the Damned Argon bottle is almost empty. Oh well. get another bottle tomorrow.
Last edit: 7 years 3 months ago by Kawboy.
Please Log in or Create an account to join the conversation.
Moderators: dcarver220b
Time to create page: 0.227 seconds