
1982 KZ1300 rescue and rebuild
- StanG
-
 Topic Author
- Offline
- Banned
-

- Posts: 1987
- Thanks: 237
Re: 1982 KZ1300 rescue and rebuild
7 years 6 months ago
Well, today the tire is half flat, so any doubts are no more. When the spring comes I will need a new tire.
Today I just warmed it up - I needed to hear 'the music'.
Today I just warmed it up - I needed to hear 'the music'.
Please Log in or Create an account to join the conversation.
- StanG
-
Topic Author
- Offline
- Banned
-
- Posts: 1987
- Thanks: 237
Re: 1982 KZ1300 rescue and rebuild
7 years 5 months ago
December 31 2018. The last ride in the year and another milestone for this bike. I just reached the 1000th mile, so now officially the 6000 rpm limit is lifted!! ")
When the weather warms up next year, I will be ready for a KZ1300 sound video. Countdown starts tomorrow!
When the weather warms up next year, I will be ready for a KZ1300 sound video. Countdown starts tomorrow!
Please Log in or Create an account to join the conversation.
- StanG
-
Topic Author
- Offline
- Banned
-
- Posts: 1987
- Thanks: 237
Re: 1982 KZ1300 rescue and rebuild
7 years 5 months ago - 7 years 5 months ago
Just to add to where the bike is now.
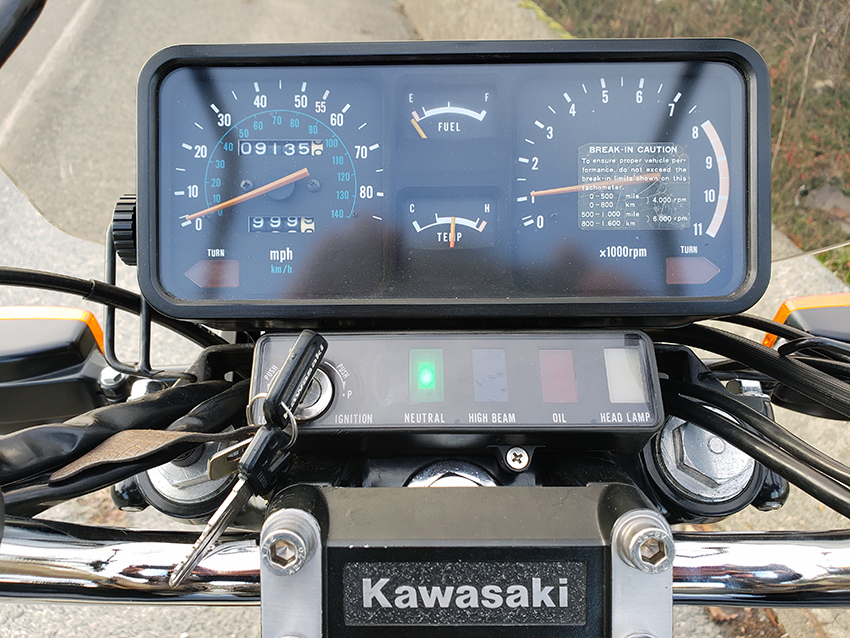
I haven't hooked up the fuel level sensor yet, but I have the right connector. Not in a hurry to pull the tank off to do it at the moment.
The RPM is actually at 1000, but the needle fluctuates a bit.
The temperature shown is as far as it goes - that's when the fan kicks in. Not bad. I am using a ZN sensor rated 10 degrees lower than native KZ.
The tire is still punctured but plugged. Doesn't last after all. Pump it to 42 PSI and ride it for a couple hours, seems fine, park it and next day is down to 6. A new tire arrived and I just need to remove the wheel and take it for a change - that will be in the first week of 2019. I can ride aggressively now with the plug but slow down cornering. Opening the throttle really in straight lines.
Added a bit of engine oil. Finding it difficult to exactly measure the level in this cold weather and for fact any weather. Very finicky. Looked low, added some, seem to shifting sticky.
Moisture gets easily under the dash. Gets away with hot air rising after an hour of riding.
Petcock gets stiff when engine hot - not a new story.
The seat must go down!!! Ned to pick up that cement and make it happen. The damn local Home Depot and Canadian Tired (no pun intended), don't have any!!! Just some alternatives to the proven 3M. can never find anything I need at those stores......
Oh yeah, the new tire is here! Just need to tear that rear wheel and muffler down again. Shit!
Despite cold weather, I am preparing myself to checking the valve clearances. Anyone local Vancoveritte with a space to work on this? Pain in the ass in a cold open parking lot, but if I have to, I will.
Looking forward to putting a lot of miles on this beast next year, and taking that two KZ1300 if scotch is still around!
Cheers and until the next year.
Stan
Last edit: 7 years 5 months ago by StanG.
Please Log in or Create an account to join the conversation.
- StanG
-
Topic Author
- Offline
- Banned
-
- Posts: 1987
- Thanks: 237
Re: 1982 KZ1300 rescue and rebuild
7 years 1 month ago - 7 years 1 month ago
Great day today. I did the first synchronizing after the brake in, at 9500 miles.
The #1 and #2 carburetors were off by about 15% (#1 higher than #2). Both adjusted to average 21 cmHg. (showing cylinder 1, 2, 3, 4) The bike is leaning very slightly, perhaps 2 - 3 degrees, to the left.
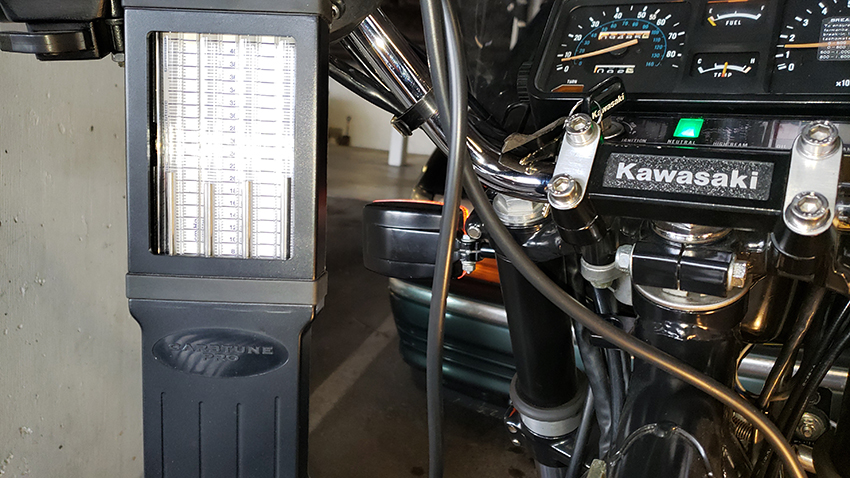
Then the same thing with carb #2 and #3. Same average 21 cmHg. (showing cylinders 5, 6, 3, 4)
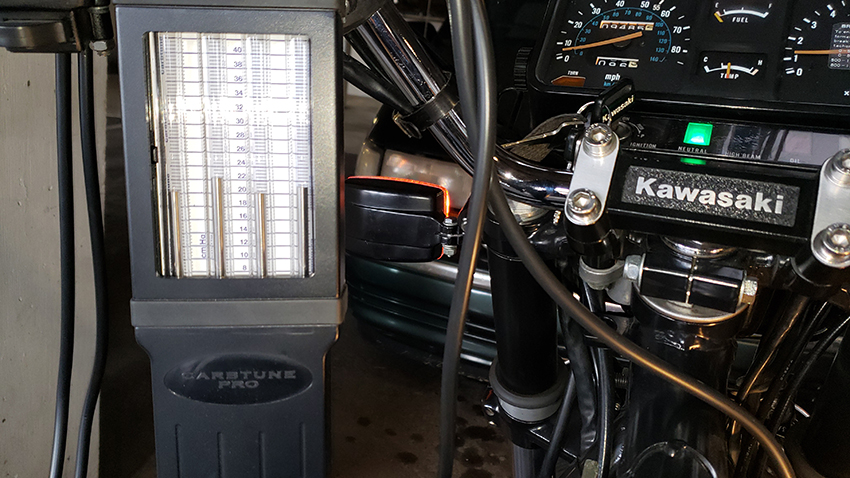
I don't know how accurate the Carbtune Pro is with numbers. I haven't calibrated it nor checked against a reliable vacuum reader, so I don't know if these numbers reflect actual vacuum reading. But the manufacturer guarantees them to be set correctly, and I am going with this. And Ass the engine is right after a full rebuild, I don't really care about the numbers. The important thing is they are all at 21 average and synchronized. Next time around I will play with hooking them up one by one to one port and see if they read identical. But so far, they performed flawlessly on other bikes.
I also cleaned and checked all the spark plugs (set at 0.75 mm). I used Colortune to check the air/fuel ratio visually. I aimed at good bunsen blue and nice transmission to bright orange and yellow with a twist of the throttle. I don't remember what exactly the settings were for each cylinder, and I haven't counted the turns now, so I am just guessing all are set at about 2 - 2.5 turns as I turned them back 1 - 1.5 turns. I am going to take a look at the valve clearances soon, so I will be revisiting synchronizing and air/fuel mix and I will count the turns then.
Right now I just wanted to quickly synchronize the carbs and to check the ratio. The bike runs much better! Very smooth, better response on acceleration. Also, the gears change smoother.I am very pleased, the bike rides flawlessly.
Having the tank off I also finally hooked up the fuel gauge. I used a gauge from an unknown bike. I've already checked the resistance (there are numbers for it in the manual), and adjusted the range for empty and full.
Since the male plug was missing, I got an exactly the same Honda plug and it fit perfectly the one on the harness. The wires have different colors, it's good to remember that the vertical connector is live, and the horizontal is ground. I put 10 liter on an almost empty tank and it shows a bit below half on a bit tilted bike - seems correct!
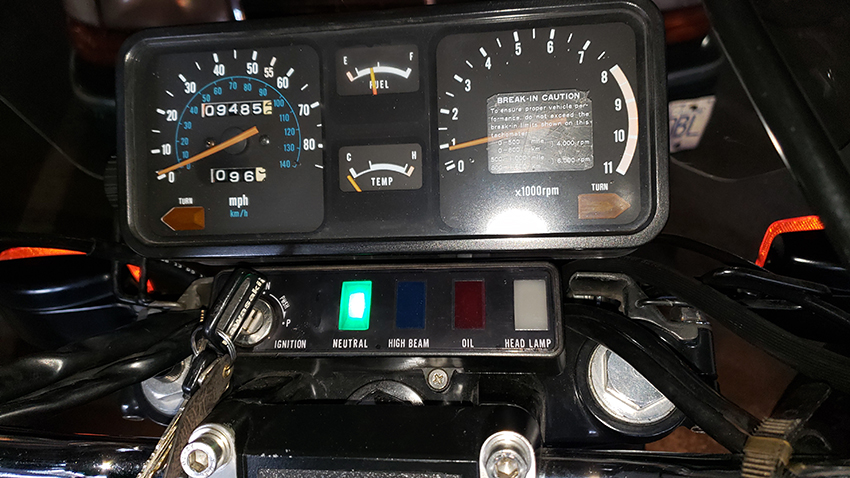
After filling it up, the needle went nicely all the way right to indicate full.
I set the distance counter to zero, let's see where the needle will be when it's time to hit reserve.
Bit by bit, addressing a few small things the bike is still improving. It starts like a Swiss watch, and I enjoy riding it very much. Without a question, it is one of my favorite motorcycles. It is heavy, but I find it very easy to ride and maneuver. Lots of power in any gear! It is also very comfortable. What can I say - I love it!
The #1 and #2 carburetors were off by about 15% (#1 higher than #2). Both adjusted to average 21 cmHg. (showing cylinder 1, 2, 3, 4) The bike is leaning very slightly, perhaps 2 - 3 degrees, to the left.
Then the same thing with carb #2 and #3. Same average 21 cmHg. (showing cylinders 5, 6, 3, 4)
I don't know how accurate the Carbtune Pro is with numbers. I haven't calibrated it nor checked against a reliable vacuum reader, so I don't know if these numbers reflect actual vacuum reading. But the manufacturer guarantees them to be set correctly, and I am going with this. And Ass the engine is right after a full rebuild, I don't really care about the numbers. The important thing is they are all at 21 average and synchronized. Next time around I will play with hooking them up one by one to one port and see if they read identical. But so far, they performed flawlessly on other bikes.
I also cleaned and checked all the spark plugs (set at 0.75 mm). I used Colortune to check the air/fuel ratio visually. I aimed at good bunsen blue and nice transmission to bright orange and yellow with a twist of the throttle. I don't remember what exactly the settings were for each cylinder, and I haven't counted the turns now, so I am just guessing all are set at about 2 - 2.5 turns as I turned them back 1 - 1.5 turns. I am going to take a look at the valve clearances soon, so I will be revisiting synchronizing and air/fuel mix and I will count the turns then.
Right now I just wanted to quickly synchronize the carbs and to check the ratio. The bike runs much better! Very smooth, better response on acceleration. Also, the gears change smoother.I am very pleased, the bike rides flawlessly.
Having the tank off I also finally hooked up the fuel gauge. I used a gauge from an unknown bike. I've already checked the resistance (there are numbers for it in the manual), and adjusted the range for empty and full.
Since the male plug was missing, I got an exactly the same Honda plug and it fit perfectly the one on the harness. The wires have different colors, it's good to remember that the vertical connector is live, and the horizontal is ground. I put 10 liter on an almost empty tank and it shows a bit below half on a bit tilted bike - seems correct!
After filling it up, the needle went nicely all the way right to indicate full.
I set the distance counter to zero, let's see where the needle will be when it's time to hit reserve.
Bit by bit, addressing a few small things the bike is still improving. It starts like a Swiss watch, and I enjoy riding it very much. Without a question, it is one of my favorite motorcycles. It is heavy, but I find it very easy to ride and maneuver. Lots of power in any gear! It is also very comfortable. What can I say - I love it!
Last edit: 7 years 1 month ago by StanG.
The following user(s) said Thank You: mizztheman
Please Log in or Create an account to join the conversation.
- biltonjim
-

- Offline
- Platinum Member
-

- Posts: 972
- Thanks: 250
Re: 1982 KZ1300 rescue and rebuild
7 years 1 month ago
It’s good to see that you are continuing with the interesting updates, Stan. Some more photos would be nice, when you get out and about on the bike again.
The following user(s) said Thank You: StanG
Please Log in or Create an account to join the conversation.
- StanG
-
Topic Author
- Offline
- Banned
-
- Posts: 1987
- Thanks: 237
Re: 1982 KZ1300 rescue and rebuild
7 years 1 month ago
Thank you Jim. I will post when the weather gets warmer and more sunshine on a daily basis. I am going to do the valve clearances probably this coming weekend, and revisit the synchronization and AFR. Then - the bike will go on a dyno. Really looking forward to seeing what's happening there in terms of power. I'm a man that likes nice curves in all the right places, I hope it will deliver! haha
0n Saturday I am going to test ride 2019 Yamaha FJR 1300ES at the dealership. They have a demo day. This will be the first time for me to ride a truly modern bike. Looking forward to this as well.
0n Saturday I am going to test ride 2019 Yamaha FJR 1300ES at the dealership. They have a demo day. This will be the first time for me to ride a truly modern bike. Looking forward to this as well.
Please Log in or Create an account to join the conversation.
Moderators: dcarver220b
Time to create page: 0.329 seconds