
Lean Idle
- Kawboy
-

- Offline
- Sustaining Member
-

- Posts: 3206
- Thanks: 1173
Re: Lean Idle
6 years 6 months agoDaro wrote: Hi, I thing I'm being misunderstood. I have a perfectly running bike, but to get there it was quiet long road I have traveled. I was reading threads here and applied the ideas to my bike, also I've donne some things on my own and now I just wanted to share the information back. That was primarily my intention so someone else don't have to go through steps like for example putting weighs on the slides or double and triple check everything. The main principle of tech forum is to share knowledge and if no one wrights about there experience than where will it come from ? OK I hope I clarified my self, and thanks for understanding. As my time allows I will describe the particular things here one by one.
Daro
Thanks for the clarification Daro. We appreciate that you took the time to share your process and it's obvious that you have a lot of experience with CV carbs to have tried some of the things that you did. Many of the ideas you tried I've seen done in the past with failed results. I'm a firm believer in the KIS principal. Keep It Simple. If it worked in the beginning, what changed and has now caused the problem? Answer that question and you're well on the way to solving the issue.
Please Log in or Create an account to join the conversation.
- scotch
-

- Offline
- Sustaining Member
-
- Posts: 1994
- Thanks: 902
Re: Lean Idle
6 years 6 months ago - 6 years 6 months ago
Hi, I thing I'm being misunderstood. I have a perfectly running bike,
Well that puts a bit of a different spin, on things ! None the less - still admire your determination !
Not a complete waste of time as many areas/ideas were discussed; for the enlightenment of others !
Well that puts a bit of a different spin, on things ! None the less - still admire your determination !
Not a complete waste of time as many areas/ideas were discussed; for the enlightenment of others !
1980 KZ 1300 sr# KZT30A-009997
Always High - Know Fear !
Always High - Know Fear !
Last edit: 6 years 6 months ago by scotch.
Please Log in or Create an account to join the conversation.
- tackelhappy
-
- Offline
- Platinum Member
-

- Posts: 408
- Thanks: 163
Re: Lean Idle
6 years 6 months ago
Disassembled the carbs again and checked the pilot jets with a magnifying glass and all are in good condition and clean. I used the Scotch cleaning tool on the original clean , this time around , brake cleaner in an aerosol can with the red plastic tube that came with the can into the various ports etc . One finger holding the butterfly open , outside the shed holding the carb upto the sunlight observing the brake cleaner gushing out of the transition ports. The point being the aerosol can having lots of pressure and being able to observe the results. Inserting the cleaning tool into the carb to hold the butterflies open while cleaning the other side also helped. The carbs have been completely dissembled to do this. I have reshaped the pilot screw tip as you mentioned Scotch. Will check float levels again when re assembling. But so far ,no issues have been found.
So it leads me back to a timing issue/ problem. The cam chain has about 80,000 kms on it . It is not yet to it's service limit, but getting close.
So it leads me back to a timing issue/ problem. The cam chain has about 80,000 kms on it . It is not yet to it's service limit, but getting close.
" If you can't say what you think, very soon you won't be able to think !
OKANAGAN FALLS. BC ,Canada
OKANAGAN FALLS. BC ,Canada
Please Log in or Create an account to join the conversation.
- Daro
-
- Offline
- Premium Member
-

- Posts: 144
- Thanks: 80
Re: Lean Idle
6 years 6 months ago - 6 years 6 months ago
I'm sure it has been previously often discussed but here one more time, the story of my carburetor cleaning and overhaul, because my motorcycle has exhibit symptoms of not properly running which i often see from other members here.
From the beginning I own this bike, it had this typical problems with carburettors, rpm hanging on throttle snap, bogging while driving (first gear just rolling) in to the roundabout for example, super rich on snap wide open under load (overtaking) spark plugs completely black, carbs overflowing or air locks in the fuel line, no problems starting cold thou, but when warm, after standing for 30 minutes or so it was a b**ch to start up again. So here some description and pictures how I resolve those problems to help others tackle theirs. This is how I did,,,,,,, but a lot of tips are coming from Scotch, who is very very experienced in this field, and so first of all I thank you for the help mate.
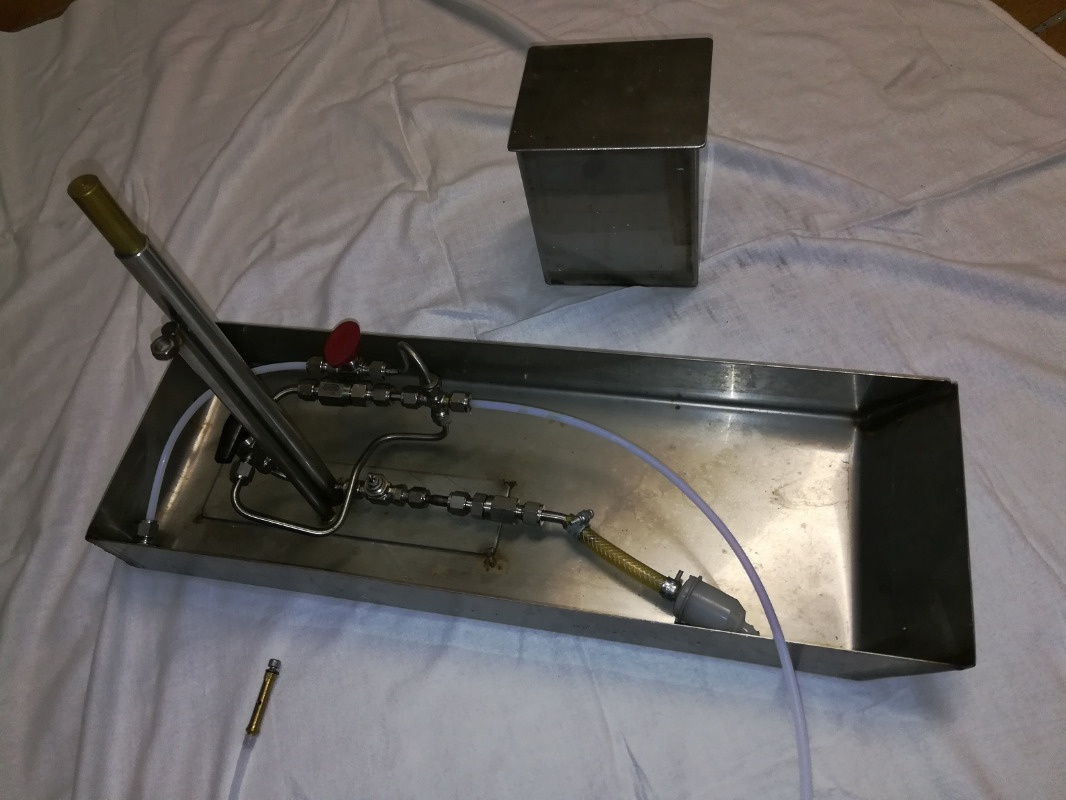
First obviously disassembly, cleaning, boiling it in distilled water (don't use normal water to boil, it will leave nasty scale stain on and inside of the carb), flushing, blowing with air. I have build cleaning pump, it can move the liquid (fuel, thinner) for and backwards and also I can supply the air in to the system, this because I find that air bubbles help to break off the rust stain or particles in some of more troublesome areas of the carburetor.
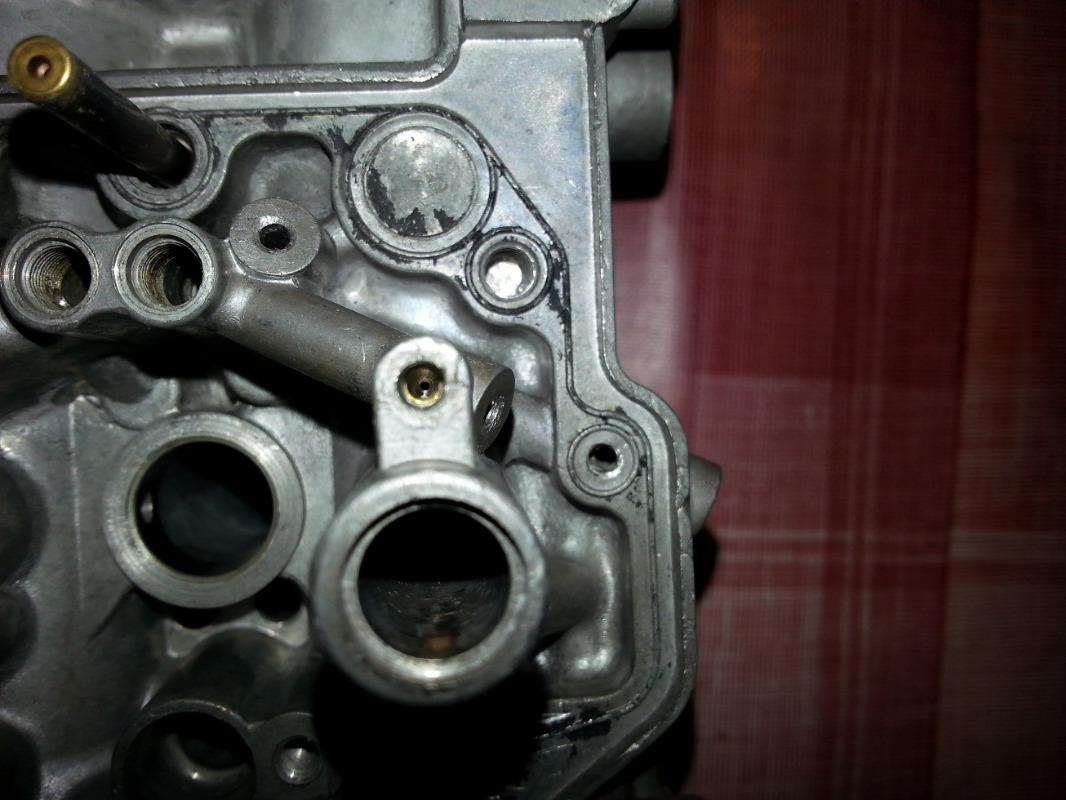
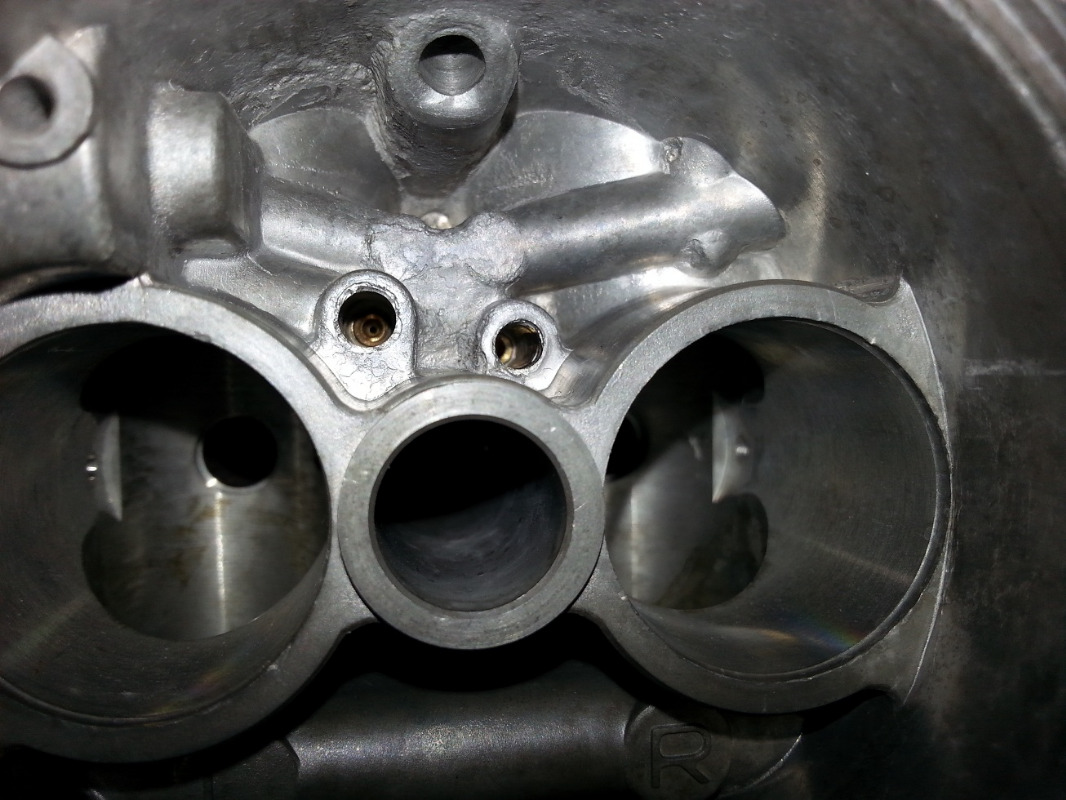
And also prior to flushing I soak them for about 20 minutes in Tangit, [(don't spill it, it will burn hole in you lawn, or in the garage floor, also if you take it too long it will start to dissolve the brass gallery pin seal ] to remove some of the stain in the galleries, than I blow the passages with probably enough air to supply the whole planet. After I clean them thoroughly I drunk one bear, and than I started all over again, just in case. You could skip the step with the beer if you want, but I really don't recommend this. For soaking in Tangit, I have removed all the jets, everything else including the butterfly valve and seals, ONLY carburetor body and brass gallery inserts (once I even drill them all out to see what's behind, picture later) remain, any plastic or rubber parts would have dissolve instantly otherwise.
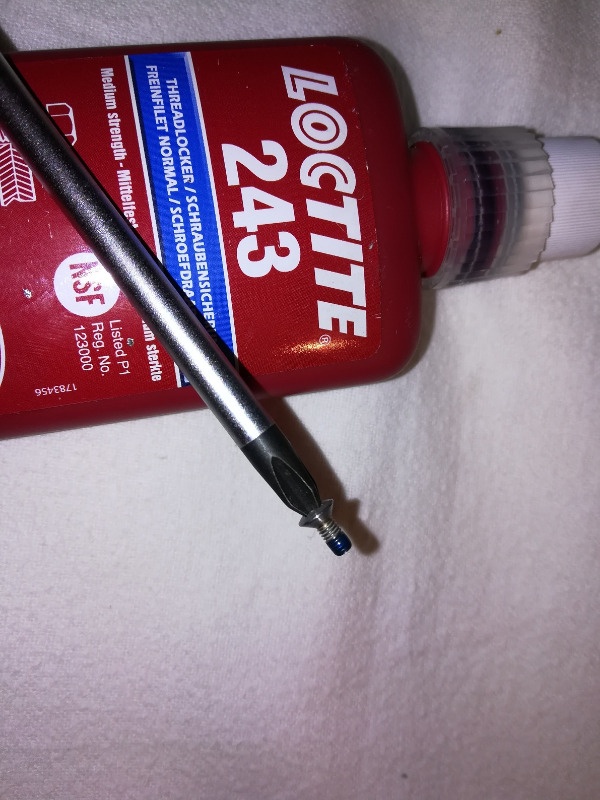
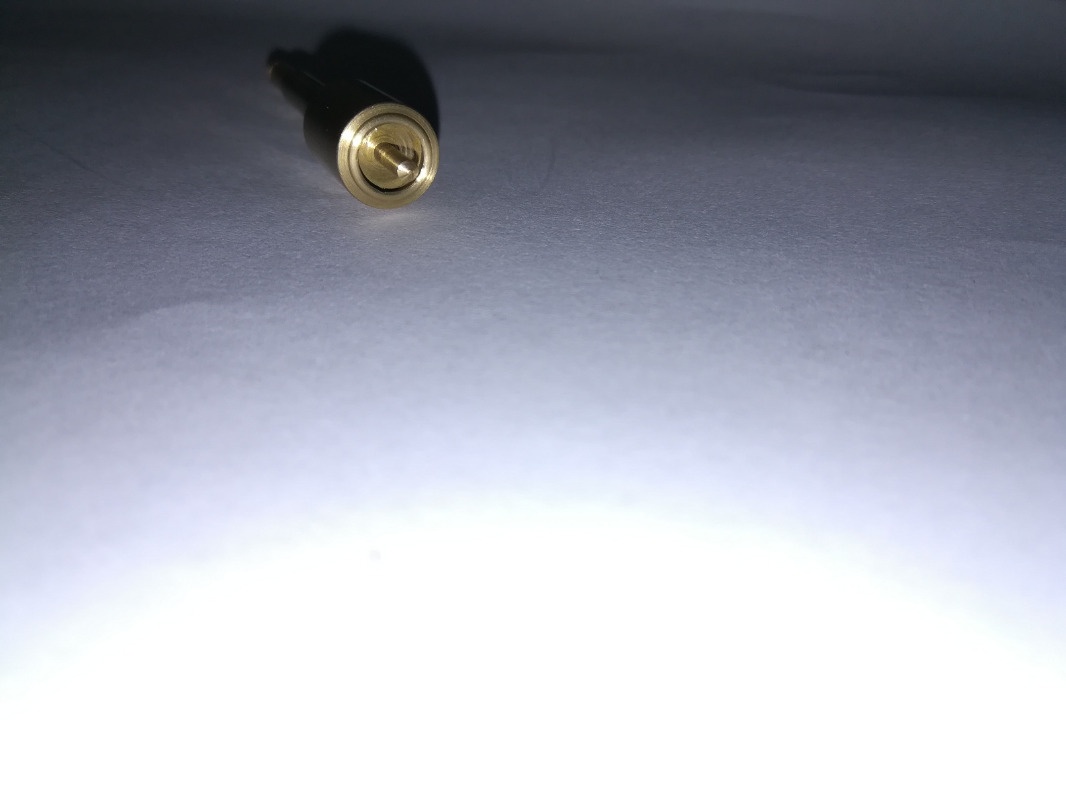
After that as the first step, the assembly of the butterfly valve, with new seals and using loctite 243 thread locker on the screws. Putting the butterfly valves in the shaft slot is difficult at minimum, it requires concentration and steady hand, (if you tired don't do it), return spring must be hanged AFTER you put the screws in both valves. In later stage, while sliding the plates in the slots when about 90 percent of it is in the slot it self, you should move the shaft left and right slowly, repeatedly, with no pressure at all while very very lightly closing throttle in order to set the plates to fit the bore of the venturi (that's the difficult bit) and when they are in, you need to center the holes for the screws (they should already almost fit) almost in the middle for both holes in both valves. Verify the fitment of the plates (by looking through the venturi to the light) before putting screws in and hold the valves closed with the finger on the lever. Next steps: Plastic washer, circlip, and the cap (cap only once, on the left and right carb body) and than so hated leaky needle valve, holding plate, and microscopic size retaining wire clip, emulsion tubes, main jets, idle jets, the plug screw (everything proper clean), float plus pin, finally the float bowl. You done.

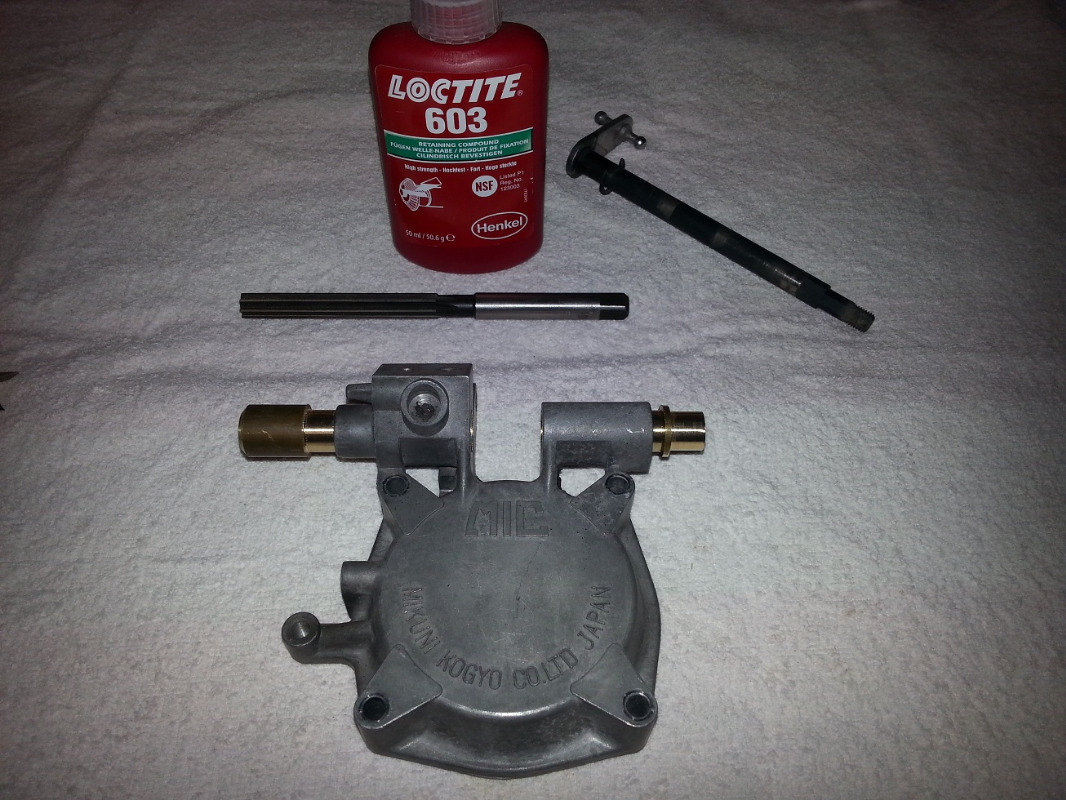
Now to the top, first thing I have notice was when applying choke (fast idling cam action), on the left side of the carb link rod was moving down more than the right one, due to play the linkage shaft has developed in relation to the cap. Repair was more or less straight forward, drilling out the bore, making and fitting brass insert using loctite 603 and than reaming the hole to the size and putting all the parts of the pulley together again. Than goes the membrane and slides with needle set to standard spec at first, (circlip in third notch counting from the top or bottom if you have needle with 5 notches, some of the first needles have had only one notch) and finally the cap with four new hex screws, on the left side enricher, membrane with spring, seat and cover. That's one of three carburetor done.

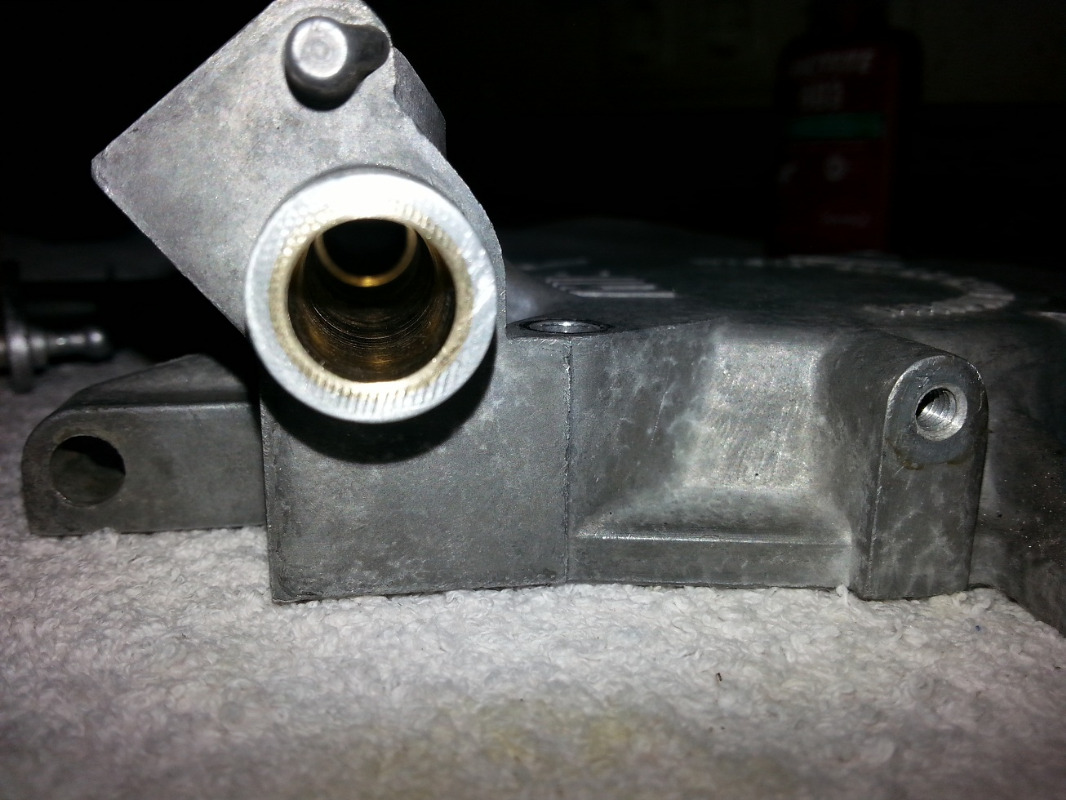
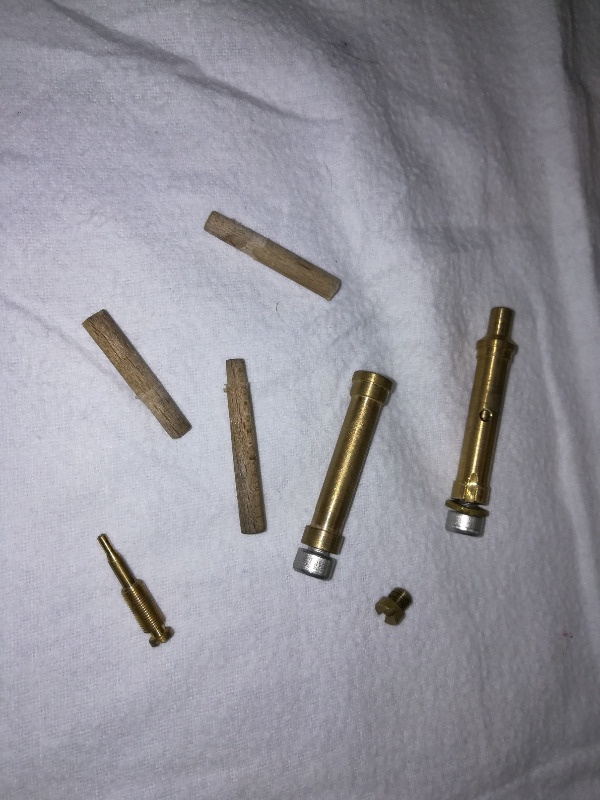
Also while I had them parted I have made new fuel connectors out of brass and with viton o rings (size 7x2 mm). T part is made out of two parts obviously and soldered together using hot air gun.

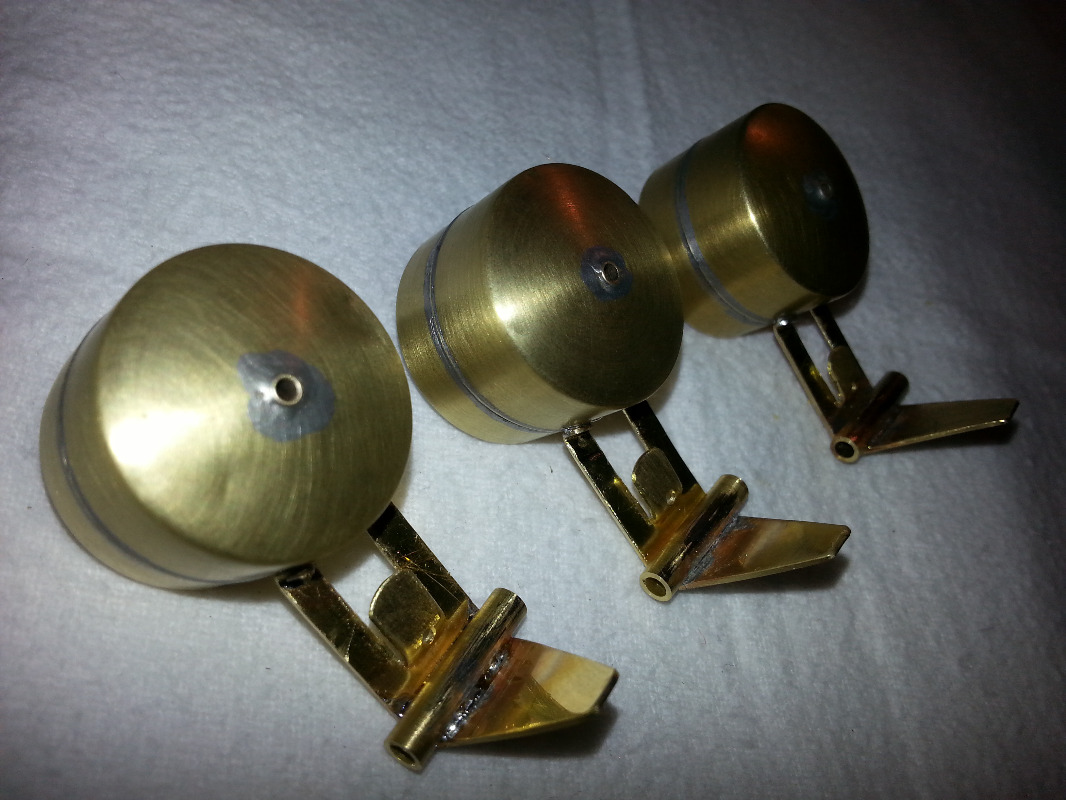
After i have read the article about carburetor restoration written by Scotch, l build those brass floats, the bodies are coming from bing 32 carburetor if i remember correctly and the arms i made out of brass stripe using the jig.
Also while I had them parted I have made new fuel connectors out of brass and with viton o rings (size 7x2 mm). T part is made out of two parts obviously and soldered together using hot air gun.
After putting all together I set the fuel level to various heights, re-jeted the carb in different combinations to see how it reacts while trying to tackle the wide open throttle rich condition and off idle bog. Also driving with restricted filter or completely open air intake.
All in all it turned out that for me the ideal jetting is main 110 idle 47,5 and the idle screw 2,5-3 turns out it varies between the 6 intakes and is set with color-tune plug and the needle at 4-th notch counting from the bottom. Fuel level sits at 7 mm from the bottom edge but with tendency to 7,5.
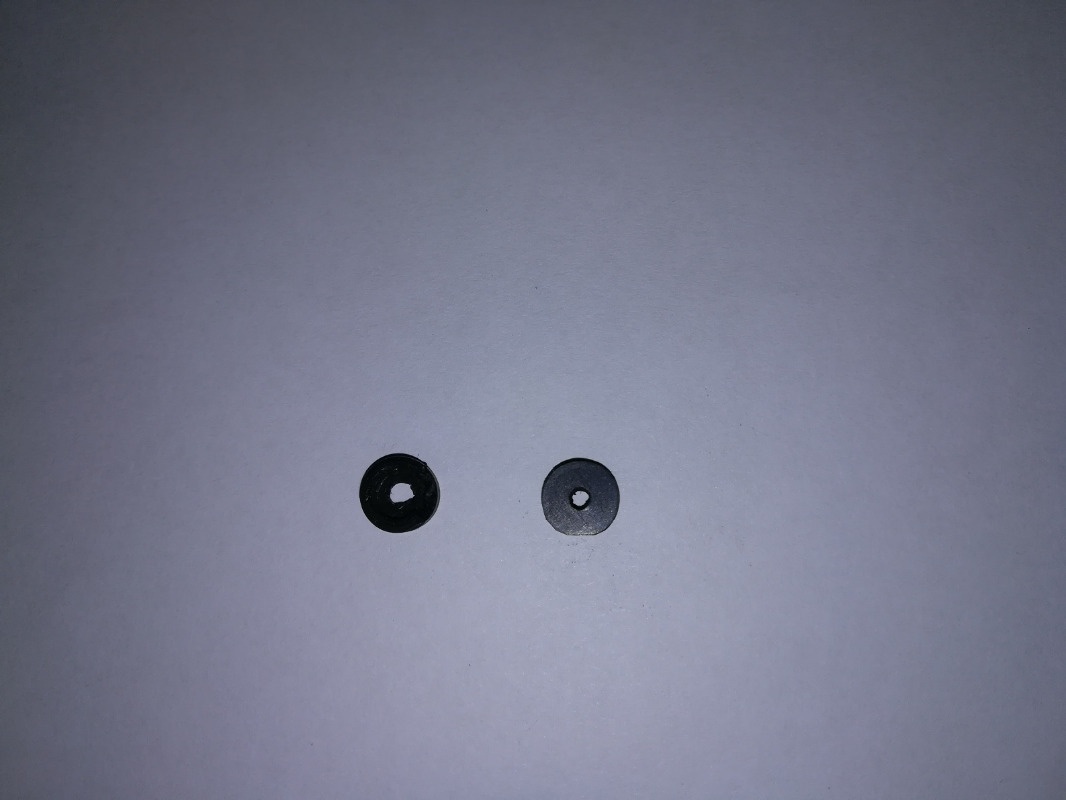
I forgot to add, the choke plungers have got now also new viton seal made out of viton sheet.
And also troublesome areas of the carburetor mentioned earlier.
To be able to jet the carburetor or better to say to see what I'm doing I have build lambda sensors in collector boxes under the oil pan, so I can tell what changes is it doing to the engine behavior.
From the beginning I own this bike, it had this typical problems with carburettors, rpm hanging on throttle snap, bogging while driving (first gear just rolling) in to the roundabout for example, super rich on snap wide open under load (overtaking) spark plugs completely black, carbs overflowing or air locks in the fuel line, no problems starting cold thou, but when warm, after standing for 30 minutes or so it was a b**ch to start up again. So here some description and pictures how I resolve those problems to help others tackle theirs. This is how I did,,,,,,, but a lot of tips are coming from Scotch, who is very very experienced in this field, and so first of all I thank you for the help mate.
First obviously disassembly, cleaning, boiling it in distilled water (don't use normal water to boil, it will leave nasty scale stain on and inside of the carb), flushing, blowing with air. I have build cleaning pump, it can move the liquid (fuel, thinner) for and backwards and also I can supply the air in to the system, this because I find that air bubbles help to break off the rust stain or particles in some of more troublesome areas of the carburetor.
And also prior to flushing I soak them for about 20 minutes in Tangit, [(don't spill it, it will burn hole in you lawn, or in the garage floor, also if you take it too long it will start to dissolve the brass gallery pin seal ] to remove some of the stain in the galleries, than I blow the passages with probably enough air to supply the whole planet. After I clean them thoroughly I drunk one bear, and than I started all over again, just in case. You could skip the step with the beer if you want, but I really don't recommend this. For soaking in Tangit, I have removed all the jets, everything else including the butterfly valve and seals, ONLY carburetor body and brass gallery inserts (once I even drill them all out to see what's behind, picture later) remain, any plastic or rubber parts would have dissolve instantly otherwise.
After that as the first step, the assembly of the butterfly valve, with new seals and using loctite 243 thread locker on the screws. Putting the butterfly valves in the shaft slot is difficult at minimum, it requires concentration and steady hand, (if you tired don't do it), return spring must be hanged AFTER you put the screws in both valves. In later stage, while sliding the plates in the slots when about 90 percent of it is in the slot it self, you should move the shaft left and right slowly, repeatedly, with no pressure at all while very very lightly closing throttle in order to set the plates to fit the bore of the venturi (that's the difficult bit) and when they are in, you need to center the holes for the screws (they should already almost fit) almost in the middle for both holes in both valves. Verify the fitment of the plates (by looking through the venturi to the light) before putting screws in and hold the valves closed with the finger on the lever. Next steps: Plastic washer, circlip, and the cap (cap only once, on the left and right carb body) and than so hated leaky needle valve, holding plate, and microscopic size retaining wire clip, emulsion tubes, main jets, idle jets, the plug screw (everything proper clean), float plus pin, finally the float bowl. You done.
Now to the top, first thing I have notice was when applying choke (fast idling cam action), on the left side of the carb link rod was moving down more than the right one, due to play the linkage shaft has developed in relation to the cap. Repair was more or less straight forward, drilling out the bore, making and fitting brass insert using loctite 603 and than reaming the hole to the size and putting all the parts of the pulley together again. Than goes the membrane and slides with needle set to standard spec at first, (circlip in third notch counting from the top or bottom if you have needle with 5 notches, some of the first needles have had only one notch) and finally the cap with four new hex screws, on the left side enricher, membrane with spring, seat and cover. That's one of three carburetor done.
Also while I had them parted I have made new fuel connectors out of brass and with viton o rings (size 7x2 mm). T part is made out of two parts obviously and soldered together using hot air gun.
After i have read the article about carburetor restoration written by Scotch, l build those brass floats, the bodies are coming from bing 32 carburetor if i remember correctly and the arms i made out of brass stripe using the jig.
Also while I had them parted I have made new fuel connectors out of brass and with viton o rings (size 7x2 mm). T part is made out of two parts obviously and soldered together using hot air gun.
After putting all together I set the fuel level to various heights, re-jeted the carb in different combinations to see how it reacts while trying to tackle the wide open throttle rich condition and off idle bog. Also driving with restricted filter or completely open air intake.
All in all it turned out that for me the ideal jetting is main 110 idle 47,5 and the idle screw 2,5-3 turns out it varies between the 6 intakes and is set with color-tune plug and the needle at 4-th notch counting from the bottom. Fuel level sits at 7 mm from the bottom edge but with tendency to 7,5.
I forgot to add, the choke plungers have got now also new viton seal made out of viton sheet.
And also troublesome areas of the carburetor mentioned earlier.
To be able to jet the carburetor or better to say to see what I'm doing I have build lambda sensors in collector boxes under the oil pan, so I can tell what changes is it doing to the engine behavior.
Last edit: 6 years 6 months ago by Daro.
The following user(s) said Thank You: Bucko, zed_thirteen, mizztheman, StanG
Please Log in or Create an account to join the conversation.
- Kawboy
-
- Offline
- Sustaining Member
-
- Posts: 3206
- Thanks: 1173
Re: Lean Idle
6 years 6 months ago
The Man's got tools and the talent to use them. Nice work !! It will be interesting to see how the floats work out for you. Different shape than Scotch's.
The following user(s) said Thank You: Daro
Please Log in or Create an account to join the conversation.
- Daro
-
- Offline
- Premium Member
-
- Posts: 144
- Thanks: 80
Re: Lean Idle
6 years 6 months ago - 6 years 6 months ago
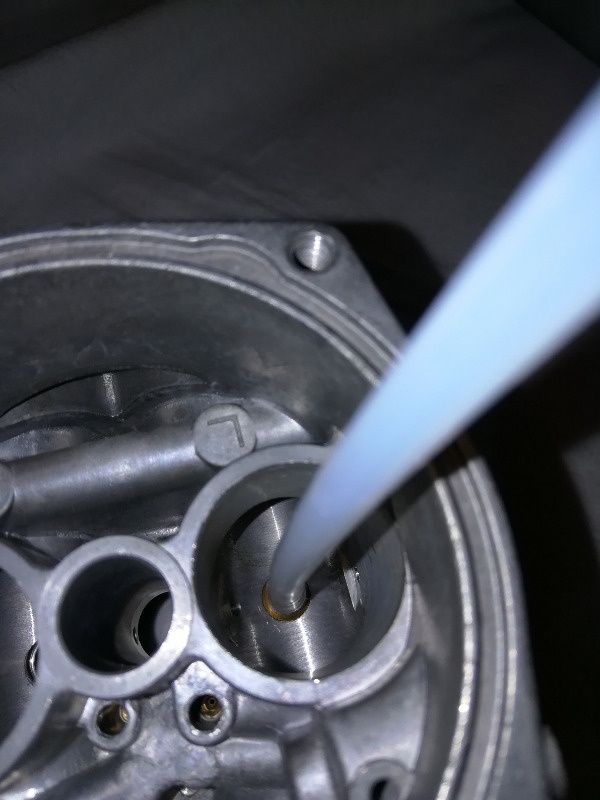
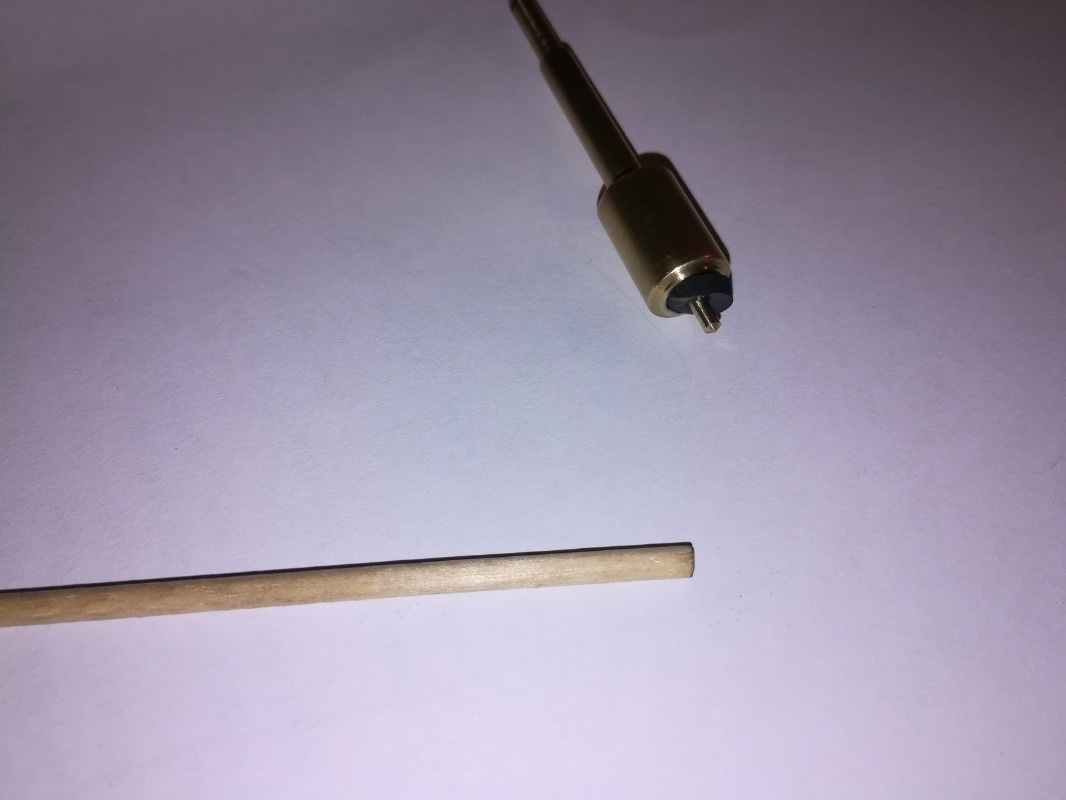
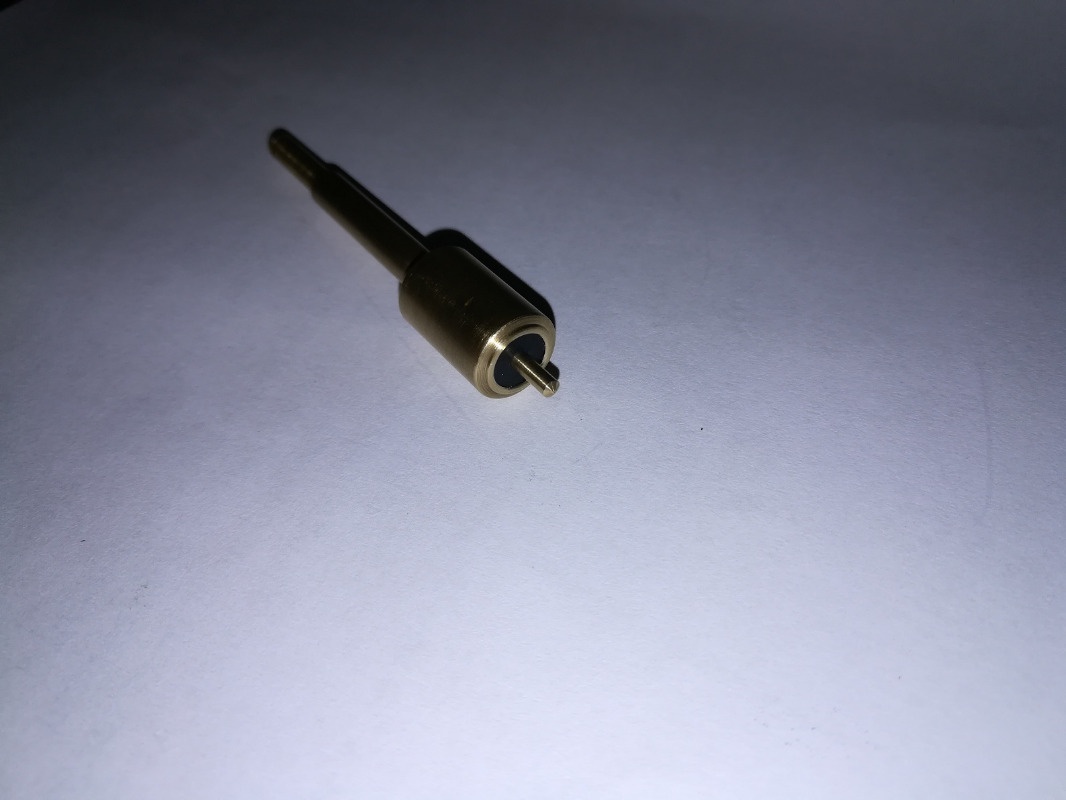
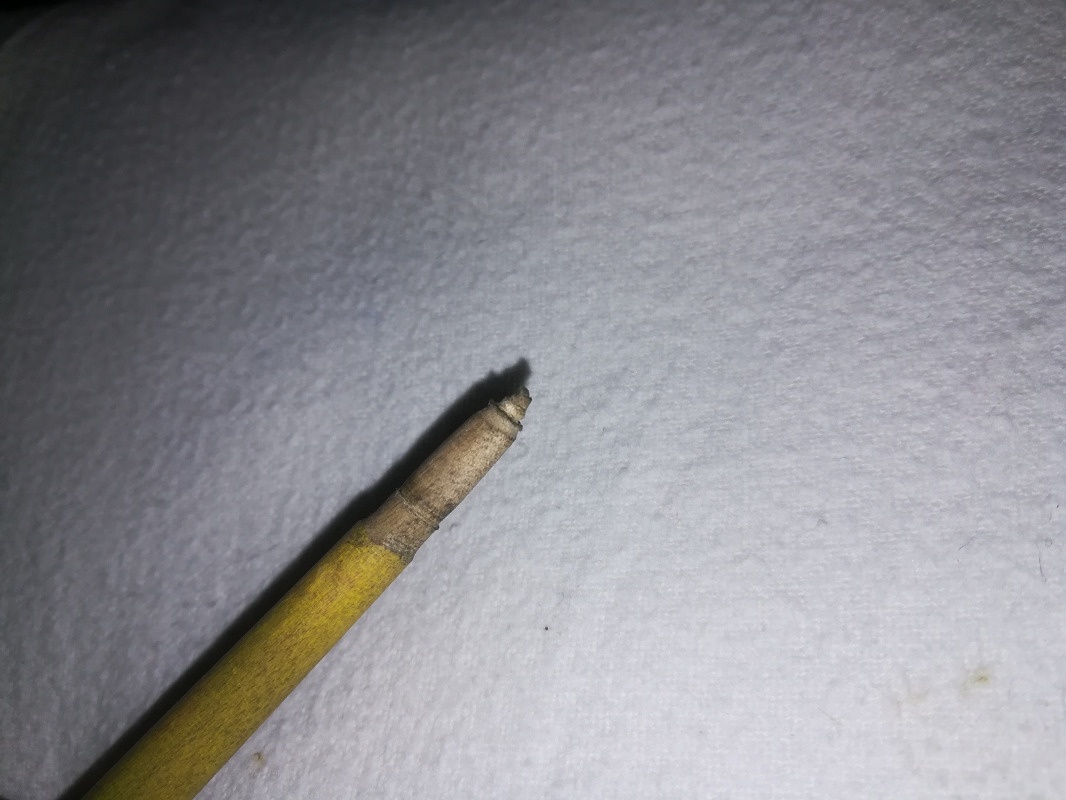
Kawboy my floats are ok, the function of them leave nothing more to desire i never had float valve leak with them, also while using original floats due to properly polished seat inside of the float valve body. Here the picture of the stick i use to polish the seat. Its a handle from small round brush and its made of some hardwood. Also here the link to video of me making the floats. I did them because i want it to have my own floats in carbs as a spear alternative in case i needed one. Or i could have simply bought them from Scotch, but I'm more of this DIY guy, ya know.
Thanks Daro
Thanks Daro
Last edit: 6 years 6 months ago by Daro.
The following user(s) said Thank You: Bucko, StanG, A1
Please Log in or Create an account to join the conversation.
Moderators: scotch
Time to create page: 0.210 seconds