
Electrical
Removing the speedo assembly
- LareNurminen
-

- Offline
- Sustaining Member
-

- Posts: 271
- Thanks: 153
Re: Removing the speedo assembly
6 years 7 months ago
I sell the needles on eBay. If you Pm me, I can send them directly, saves a few dollars for us both. You can pay with PayPal.
Please Log in or Create an account to join the conversation.
- scotch
-

- Offline
- Sustaining Member
-
- Posts: 2033
- Thanks: 938
Re: Removing the speedo assembly
6 years 7 months ago - 6 years 7 months ago
I purchased these instrument needles from LareNurminen. Several ways to install. Identical in appearance. Back to OEM status.
Regarding: The face seems to be coated with a powdery like finish. I guess it's to be anti reflective. Is there any medium out there available to coat surfaces this way, especially for such delicate items?
In my opinion, I would NOT attempt any such "treatment". There is a very likely chance of destroying the factory "labelling" and finish with an incompatible product. There are "decals" available - I've seen them for sale.
I've mentioned this before and will re-iterate at the risk of some laughter.
If the dial face needs some light cleaning without fear of removing the surface application ......"spit". :ohmy: This tip came from a technician with 30+ years of experience servicing Mechanical Cash registers (NCR) which used the rotary and pop-up indicators. It works and does so very effectively ! I use a "Kleenex" to do the light rubbing. Best Not to be sucking on a "Wurthers" at this time. :pinch: This method also removes "Fly poop", too ! (Don't ask) :woohoo:
1980 KZ 1300 sr# KZT30A-009997
Always High - Know Fear !
Always High - Know Fear !
Last edit: 6 years 7 months ago by scotch.
Please Log in or Create an account to join the conversation.
- Bucko
-
- Offline
- Platinum Member
-

- Posts: 661
- Thanks: 165
Re: Removing the speedo assembly
6 years 7 months agoLareNurminen wrote: I sell the needles on eBay. If you Pm me, I can send them directly, saves a few dollars for us both. You can pay with PayPal.
Can you let me know the length of those needles. I have a Honda that needs new needles and these might work depending on the length.
Hello from Canada's We(s)t coast.
Please Log in or Create an account to join the conversation.
- Lucien-Harpress
-

- Offline
- Platinum Member
-
- Posts: 374
- Thanks: 99
Re: Removing the speedo assembly
6 years 7 months ago - 6 years 7 months ago
The needles are almost exactly 1 7/8", but (if going on a Honda) will need a base to pivot off of- I just snagged a set of needles myself to refirb a couple of extra gauges I had, and the intent is to re-use the stock KZ1300 base. If you can make this work, however, the needles themselves are fantastic products.
As far as the "powdery" substance on the gauge faces- this, in all likelyhood, is the paint on the faces starting to come off. :blink: If your faces still look fine, the best course of action is to just leave them alone. My gauges are in decent shape, and I can confirm there's no kind of extra anti-reflective coating, apart from the flat black of the gauge background.
As far as the "powdery" substance on the gauge faces- this, in all likelyhood, is the paint on the faces starting to come off. :blink: If your faces still look fine, the best course of action is to just leave them alone. My gauges are in decent shape, and I can confirm there's no kind of extra anti-reflective coating, apart from the flat black of the gauge background.
Last edit: 6 years 7 months ago by Lucien-Harpress.
Please Log in or Create an account to join the conversation.
- StanG
-
 Topic Author
- Offline
- Banned
-

- Posts: 1987
- Thanks: 237
Re: Removing the speedo assembly
6 years 7 months ago
To confirm, I got these from LareNurminen.
Scotch, yeah, by intuition I avoided even touching the faces at all costs! I made a stand cutting the bottom of a yoghurt container, at the right height, and keeping the gauge securely sit in it. To keep the dial fro, rotating while the needle cured overnight - I jammed a folded piece of paper under the center disk.
The coating - I am sure the type of medium used was specifically designed to keep any glare from happening. Like in slick gloss versus matte porous surface. Like what you see inside reflex cameras - it's matte and porous to eliminate light reflection. The stock dial surface resembles that finish. But actually that's not what I had in mind when asking, knowing dial replacements are out there to buy. (do they offer a similar finish or just mimic the look? - I have no idea)
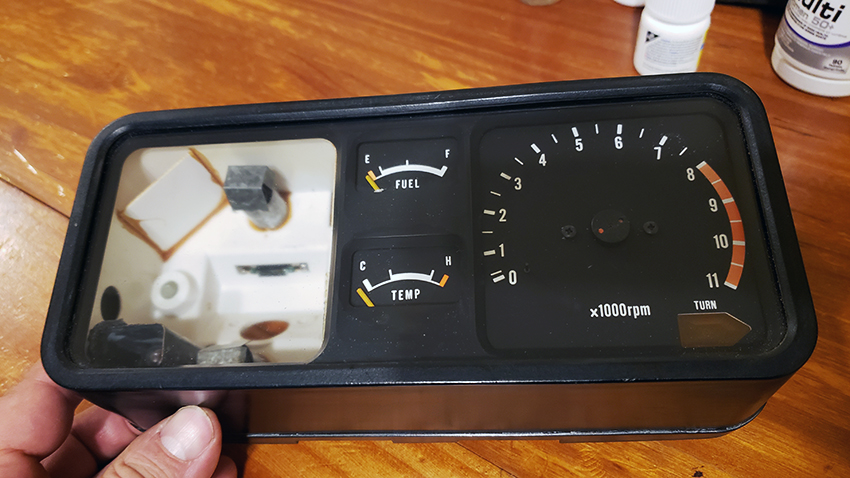
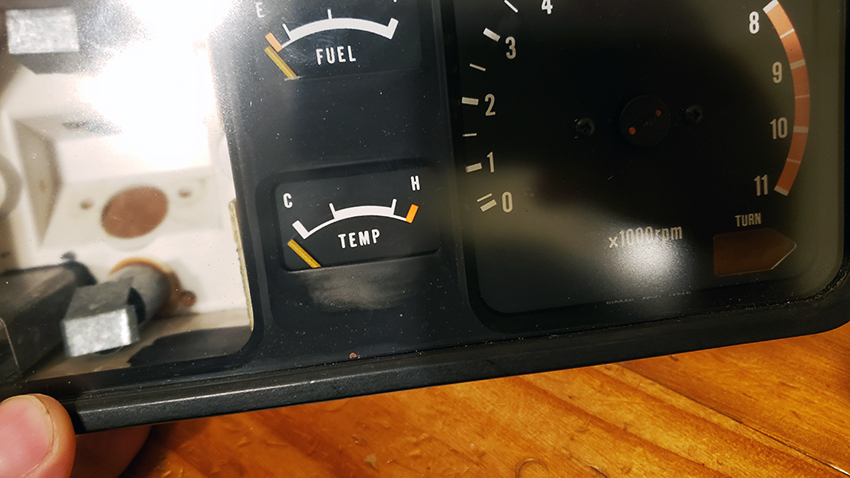
My concern is the surface which is directly under the 'glass'. I thought it's just black plastic. Apparently not! There was a little spot between the face and the glass and I wanted to wipe it off with a cloth. That seems to wipe the surface of the face and disturb what to me seems like a special coating I mentioned. Now to the photos...
Looks great but.. under viewed from different angle not so. I will not care at all if this will not be noticable when mounted on the bike. Still, curious about ways of correcting this. I thought about squaring off the affected area to make it look uniform and consistent. But first - need to take care of the needle on the tach meter.
Scotch, yeah, by intuition I avoided even touching the faces at all costs! I made a stand cutting the bottom of a yoghurt container, at the right height, and keeping the gauge securely sit in it. To keep the dial fro, rotating while the needle cured overnight - I jammed a folded piece of paper under the center disk.
The coating - I am sure the type of medium used was specifically designed to keep any glare from happening. Like in slick gloss versus matte porous surface. Like what you see inside reflex cameras - it's matte and porous to eliminate light reflection. The stock dial surface resembles that finish. But actually that's not what I had in mind when asking, knowing dial replacements are out there to buy. (do they offer a similar finish or just mimic the look? - I have no idea)
My concern is the surface which is directly under the 'glass'. I thought it's just black plastic. Apparently not! There was a little spot between the face and the glass and I wanted to wipe it off with a cloth. That seems to wipe the surface of the face and disturb what to me seems like a special coating I mentioned. Now to the photos...
Looks great but.. under viewed from different angle not so. I will not care at all if this will not be noticable when mounted on the bike. Still, curious about ways of correcting this. I thought about squaring off the affected area to make it look uniform and consistent. But first - need to take care of the needle on the tach meter.
Please Log in or Create an account to join the conversation.
- Bucko
-
- Offline
- Platinum Member
-
- Posts: 661
- Thanks: 165
Re: Removing the speedo assembly
6 years 7 months ago - 6 years 7 months ago
Stan: Years ago, I had exactly the same thing happen to my KZ1300 cluster glass. I wondered if there was some sort of an anti-fog or UV.coating (or anti-reflective treatment as you suggest)..
Hello from Canada's We(s)t coast.
Last edit: 6 years 7 months ago by Bucko.
Please Log in or Create an account to join the conversation.
Moderators: scotch
Time to create page: 0.178 seconds