
Camshaft chain timing
- bendtsen
-
 Topic Author
- Offline
- New Member
-

- Posts: 3
- Thanks: 0
Camshaft chain timing
5 years 8 months ago
I am assembling the engine after revating the cylinders with new pistons, and now I am in doubt of the correct setting of the cam chain timing.
I have set it as I think it is described in the manual, picture 1, but when I compare with how it sat when I disassembled the engine, picture 2, it looks like there is 1 edge to difference. In both pictures the T mark on the alernator rotor is spot on.
I can see the engine has been disassembled before, as it was assembled with liquid gaset all over, even between cylinder block and cylinder head.
Your advice witch setting is correct will be very much appreciated.
BR Bendt
Please Log in or Create an account to join the conversation.
- bendtsen
-
Topic Author
- Offline
- New Member
-
- Posts: 3
- Thanks: 0
Please Log in or Create an account to join the conversation.
- biltonjim
-

- Offline
- Platinum Member
-

- Posts: 957
- Thanks: 249
Re: Camshaft chain timing
5 years 8 months agoPlease Log in or Create an account to join the conversation.
- Kawboy
-
- Offline
- Sustaining Member
-

- Posts: 3211
- Thanks: 1176
Re: Camshaft chain timing
5 years 8 months ago
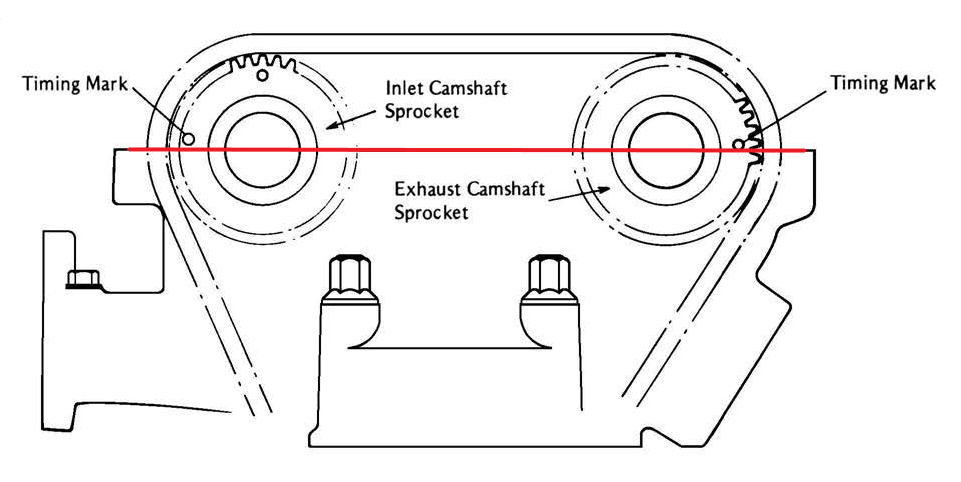
The service manual has a really good explanation of what is the correct set up. I added a red line to go across the cylinder head half joint and it shows the bottom of the circles just above the line.
Please Log in or Create an account to join the conversation.
- bendtsen
-
Topic Author
- Offline
- New Member
-
- Posts: 3
- Thanks: 0
Re: Camshaft chain timing
5 years 7 months ago
Thanks for the input.
I set it right on the marks according to manual/Kawboy, checked it several times by rotating the crankshaft, and I felt confident it was OK.
However, I started the engine and it ran just a moment, then it stopped. I could not turn it, so I took of the cylinder head cover and checked the timing. BAD, it was now several teath out of timing. After resetting the timing, no compresion. Checking with the cylinder leakage tester, I could see several valves leaking, probaply bended.
So now I am dismantling the cylinder head again.
I am not sure what I have done wrong during the assembling, I think I have followed the manual. I reused the original chain tensioner, as there was no signs of wear.
But I can see from several threads here, that I need an up grade of the chain tensioner.
Any advice or opinions where I may have failed will be appreciated.
BR Bendt
Please Log in or Create an account to join the conversation.
- Kawboy
-
- Offline
- Sustaining Member
-
- Posts: 3211
- Thanks: 1176
Re: Camshaft chain timing
5 years 7 months ago - 5 years 7 months ago
Sorry to hear this has happened to you. We have to thank you for reporting that the tensioner showed no signs of wear and yet failed and you now have bent valves. Usually we find the extending pin with chatter marks on the side where the locking balls have worn in to the side of the pin. This information just confirms that even a good looking stock tensioner can't be trusted.
You have a few choices for updating the tensioner.
1) Replace it with a tensioner from a zx11. Pretty much a straight bolt on but there is some controversy about shortening the spring 10mm or not. There are recent posts regarding this info and you'll have to make your own decision here.
2) Buy and install a manual tensioner. Easily found on EBay. The only downside is you have to make the periodic adjustments. The upside is that everytime you make an adjustment, it tells you how well the cam chain and gears are holding up.
3) You can modify the stock tensioner by building up the casting in the back end of the tensioner and drilling and tapping for a 6 mm bolt and locknut. This allows the tensioner to do its thing as designed and requires you to periodically snug up the back up bolt to prevent the tensioner from backing off which is what your stock tensioner has done here. This modification is well documented here.
Take some time and read through this post. It may help with your decision.
Cam chain tensioner upgrade
Last edit: 5 years 7 months ago by Kawboy.
Please Log in or Create an account to join the conversation.
Moderators: scotch
Time to create page: 0.311 seconds