
- Posts: 883
- Thank you received: 195
Valve Clearance Check - 1979 KZ1300
- dcarver220b
-
 Topic Author
- Offline
- Sustaining Member
-

Less
More
1 year 9 months ago - 1 year 9 months ago #31077
by dcarver220b
Valve Clearance Check - 1979 KZ1300 was created by dcarver220b
2023-02-04 Continuing with Valve CheckPlugs are looking better. I see signs of running rich, but less oil traces than before. This after a 200 mile ride.
[img]https://candybuttorg.ipage.com/pix/motobikes/wrenching/KZ1300/motobikes/wrenching/KZ1300/2023-02-04 KZ1300 Valve Check/1.jpg[/img]
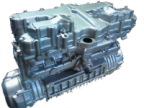
Off to checking valve clearances. 'T' mark at case mark, exhaust cam dot at valve head plane.
[img]https://candybuttorg.ipage.com/pix/motobikes/wrenching/KZ1300/motobikes/wrenching/KZ1300/2023-02-04 KZ1300 Valve Check/2.jpg[/img] [img]https://candybuttorg.ipage.com/pix/motobikes/wrenching/KZ1300/motobikes/wrenching/KZ1300/2023-02-04 KZ1300 Valve Check/3.jpg[/img] Cam lobes look shiny and good.
[img]https://candybuttorg.ipage.com/pix/motobikes/wrenching/KZ1300/motobikes/wrenching/KZ1300/2023-02-04 KZ1300 Valve Check/4.jpg[/img] Finally found a good use for old workplace name badge!
[img]https://candybuttorg.ipage.com/pix/motobikes/wrenching/KZ1300/motobikes/wrenching/KZ1300/2023-02-04 KZ1300 Valve Check/5.jpg[/img] Removing old gasket material...
[img]https://candybuttorg.ipage.com/pix/motobikes/wrenching/KZ1300/motobikes/wrenching/KZ1300/2023-02-04 KZ1300 Valve Check/6.jpg[/img] Cleaning up the rubber plug was a true PITA.
[img]https://candybuttorg.ipage.com/pix/motobikes/wrenching/KZ1300/motobikes/wrenching/KZ1300/2023-02-04 KZ1300 Valve Check/7.jpg[/img] I don't trust this one to seal. I have spare new ones.. But right now the wires are soldered. I plan to put a high quality waterproof connector with soldered wire/terminals... later.
[img]https://candybuttorg.ipage.com/pix/motobikes/wrenching/KZ1300/motobikes/wrenching/KZ1300/2023-02-04 KZ1300 Valve Check/8.jpg[/img] Checked the crank for endplay <possible clunking sound?), it is tight.
[img]https://candybuttorg.ipage.com/pix/motobikes/wrenching/KZ1300/motobikes/wrenching/KZ1300/2023-02-04 KZ1300 Valve Check/9.jpg[/img] Found a slight leak at temp sensor.. could this be the 'leak' at LHS cylinder 1 base gasket? Hmmm.
[img]https://candybuttorg.ipage.com/pix/motobikes/wrenching/KZ1300/motobikes/wrenching/KZ1300/2023-02-04 KZ1300 Valve Check/10.jpg[/img] Raw valve data.
[img]https://candybuttorg.ipage.com/pix/motobikes/wrenching/KZ1300/motobikes/wrenching/KZ1300/2023-02-04 KZ1300 Valve Check/11.jpg[/img] What FSM looks like after 44 years of use!
[img]https://candybuttorg.ipage.com/pix/motobikes/wrenching/KZ1300/motobikes/wrenching/KZ1300/2023-02-04 KZ1300 Valve Check/12.jpg[/img]
More later...
[img]https://candybuttorg.ipage.com/pix/motobikes/wrenching/KZ1300/motobikes/wrenching/KZ1300/2023-02-04 KZ1300 Valve Check/1.jpg[/img]
![[img]https://candybuttorg.ipage.com/pix/motobikes/wrenching/KZ1300/motobikes/wrenching/KZ1300/2023-02-04 KZ1300 Valve Check/1.jpg[/img]](https://candybuttorg.ipage.com/pix/motobikes/wrenching/KZ1300/motobikes/wrenching/KZ1300/2023-02-04%20KZ1300%20Valve%20Check/1.jpg)
Off to checking valve clearances. 'T' mark at case mark, exhaust cam dot at valve head plane.
[img]https://candybuttorg.ipage.com/pix/motobikes/wrenching/KZ1300/motobikes/wrenching/KZ1300/2023-02-04 KZ1300 Valve Check/2.jpg[/img] [img]https://candybuttorg.ipage.com/pix/motobikes/wrenching/KZ1300/motobikes/wrenching/KZ1300/2023-02-04 KZ1300 Valve Check/3.jpg[/img] Cam lobes look shiny and good.
![[img]https://candybuttorg.ipage.com/pix/motobikes/wrenching/KZ1300/motobikes/wrenching/KZ1300/2023-02-04 KZ1300 Valve Check/2.jpg[/img]](https://candybuttorg.ipage.com/pix/motobikes/wrenching/KZ1300/motobikes/wrenching/KZ1300/2023-02-04%20KZ1300%20Valve%20Check/2.jpg)
![[img]https://candybuttorg.ipage.com/pix/motobikes/wrenching/KZ1300/motobikes/wrenching/KZ1300/2023-02-04 KZ1300 Valve Check/3.jpg[/img]](https://candybuttorg.ipage.com/pix/motobikes/wrenching/KZ1300/motobikes/wrenching/KZ1300/2023-02-04%20KZ1300%20Valve%20Check/3.jpg)
[img]https://candybuttorg.ipage.com/pix/motobikes/wrenching/KZ1300/motobikes/wrenching/KZ1300/2023-02-04 KZ1300 Valve Check/4.jpg[/img] Finally found a good use for old workplace name badge!
![[img]https://candybuttorg.ipage.com/pix/motobikes/wrenching/KZ1300/motobikes/wrenching/KZ1300/2023-02-04 KZ1300 Valve Check/4.jpg[/img]](https://candybuttorg.ipage.com/pix/motobikes/wrenching/KZ1300/motobikes/wrenching/KZ1300/2023-02-04%20KZ1300%20Valve%20Check/4.jpg)
[img]https://candybuttorg.ipage.com/pix/motobikes/wrenching/KZ1300/motobikes/wrenching/KZ1300/2023-02-04 KZ1300 Valve Check/5.jpg[/img] Removing old gasket material...
![[img]https://candybuttorg.ipage.com/pix/motobikes/wrenching/KZ1300/motobikes/wrenching/KZ1300/2023-02-04 KZ1300 Valve Check/5.jpg[/img]](https://candybuttorg.ipage.com/pix/motobikes/wrenching/KZ1300/motobikes/wrenching/KZ1300/2023-02-04%20KZ1300%20Valve%20Check/5.jpg)
[img]https://candybuttorg.ipage.com/pix/motobikes/wrenching/KZ1300/motobikes/wrenching/KZ1300/2023-02-04 KZ1300 Valve Check/6.jpg[/img] Cleaning up the rubber plug was a true PITA.
![[img]https://candybuttorg.ipage.com/pix/motobikes/wrenching/KZ1300/motobikes/wrenching/KZ1300/2023-02-04 KZ1300 Valve Check/6.jpg[/img]](https://candybuttorg.ipage.com/pix/motobikes/wrenching/KZ1300/motobikes/wrenching/KZ1300/2023-02-04%20KZ1300%20Valve%20Check/6.jpg)
[img]https://candybuttorg.ipage.com/pix/motobikes/wrenching/KZ1300/motobikes/wrenching/KZ1300/2023-02-04 KZ1300 Valve Check/7.jpg[/img] I don't trust this one to seal. I have spare new ones.. But right now the wires are soldered. I plan to put a high quality waterproof connector with soldered wire/terminals... later.
![[img]https://candybuttorg.ipage.com/pix/motobikes/wrenching/KZ1300/motobikes/wrenching/KZ1300/2023-02-04 KZ1300 Valve Check/7.jpg[/img]](https://candybuttorg.ipage.com/pix/motobikes/wrenching/KZ1300/motobikes/wrenching/KZ1300/2023-02-04%20KZ1300%20Valve%20Check/7.jpg)
[img]https://candybuttorg.ipage.com/pix/motobikes/wrenching/KZ1300/motobikes/wrenching/KZ1300/2023-02-04 KZ1300 Valve Check/8.jpg[/img] Checked the crank for endplay <possible clunking sound?), it is tight.
![[img]https://candybuttorg.ipage.com/pix/motobikes/wrenching/KZ1300/motobikes/wrenching/KZ1300/2023-02-04 KZ1300 Valve Check/8.jpg[/img]](https://candybuttorg.ipage.com/pix/motobikes/wrenching/KZ1300/motobikes/wrenching/KZ1300/2023-02-04%20KZ1300%20Valve%20Check/8.jpg)
[img]https://candybuttorg.ipage.com/pix/motobikes/wrenching/KZ1300/motobikes/wrenching/KZ1300/2023-02-04 KZ1300 Valve Check/9.jpg[/img] Found a slight leak at temp sensor.. could this be the 'leak' at LHS cylinder 1 base gasket? Hmmm.
![[img]https://candybuttorg.ipage.com/pix/motobikes/wrenching/KZ1300/motobikes/wrenching/KZ1300/2023-02-04 KZ1300 Valve Check/9.jpg[/img]](https://candybuttorg.ipage.com/pix/motobikes/wrenching/KZ1300/motobikes/wrenching/KZ1300/2023-02-04%20KZ1300%20Valve%20Check/9.jpg)
[img]https://candybuttorg.ipage.com/pix/motobikes/wrenching/KZ1300/motobikes/wrenching/KZ1300/2023-02-04 KZ1300 Valve Check/10.jpg[/img] Raw valve data.
![[img]https://candybuttorg.ipage.com/pix/motobikes/wrenching/KZ1300/motobikes/wrenching/KZ1300/2023-02-04 KZ1300 Valve Check/10.jpg[/img]](https://candybuttorg.ipage.com/pix/motobikes/wrenching/KZ1300/motobikes/wrenching/KZ1300/2023-02-04%20KZ1300%20Valve%20Check/10.jpg)
[img]https://candybuttorg.ipage.com/pix/motobikes/wrenching/KZ1300/motobikes/wrenching/KZ1300/2023-02-04 KZ1300 Valve Check/11.jpg[/img] What FSM looks like after 44 years of use!
![[img]https://candybuttorg.ipage.com/pix/motobikes/wrenching/KZ1300/motobikes/wrenching/KZ1300/2023-02-04 KZ1300 Valve Check/11.jpg[/img]](https://candybuttorg.ipage.com/pix/motobikes/wrenching/KZ1300/motobikes/wrenching/KZ1300/2023-02-04%20KZ1300%20Valve%20Check/11.jpg)
[img]https://candybuttorg.ipage.com/pix/motobikes/wrenching/KZ1300/motobikes/wrenching/KZ1300/2023-02-04 KZ1300 Valve Check/12.jpg[/img]
![[img]https://candybuttorg.ipage.com/pix/motobikes/wrenching/KZ1300/motobikes/wrenching/KZ1300/2023-02-04 KZ1300 Valve Check/12.jpg[/img]](https://candybuttorg.ipage.com/pix/motobikes/wrenching/KZ1300/motobikes/wrenching/KZ1300/2023-02-04%20KZ1300%20Valve%20Check/12.jpg)
More later...
Last edit: 1 year 9 months ago by dcarver220b.
Please Log in or Create an account to join the conversation.
- Kawboy
-

- Offline
- Sustaining Member
-
Less
More
- Posts: 3127
- Thank you received: 1097
1 year 9 months ago #31078
by Kawboy
Replied by Kawboy on topic Valve Clearance Check - 1979 KZ1300
The manual only gives the valve clearance range of acceptability. If you are going to adjust the valves, try to adjust them to the highest clearance i.e. .15mm for the intake and .25mm for the exhaust. The biggest mistake most people make is adjusting to the tightest tolerance and then they wonder why they found tight valves and possibly burnt valves on the next valve clearance check. The reasoning behind this is that as the valve wear, they lose material from the valve seat face and the valve face due to erosion which causes the valve clearance to tighten up. I really wish the Service Manual was more clear on this point. They never tell you when repairing/replacing to return some aspect back to "as new" exactly what the ideal spec should be. This is where understanding basic fundamentals is essential if you're going to do your own maintenance. To be honest, even when i was being trained as an auto mechanic, this was never explained. it's only since working with engineers that I became more aware of the engineering aspects of mechanical equipment which has brought my understanding to a higher plain.
The following user(s) said Thank You: Ted
Please Log in or Create an account to join the conversation.
- dcarver220b
-
Topic Author
- Offline
- Sustaining Member
-
Less
More
- Posts: 883
- Thank you received: 195
1 year 9 months ago #31079
by dcarver220b
Thinking a bit, yes, be scared, me trying to think... If a feller had an engine that tends to run 'hot' perhaps it would be best to set exhaust at max clearance to allow maximum exhaust flow resulting in minimum head temps?
..and of course, 20 years later can't find my shim stack pile and shim tools. Sigh.
Replied by dcarver220b on topic Valve Clearance Check - 1979 KZ1300
Yep. Across all my 'modern' engines, valves only tighten with time. As I read your comment, I have Libre Office spreadsheet open building a KZ valve adjustment calculator. I used 70% clearance as nominal just to allow a little tolerance on the + side...The manual only gives the valve clearance range of acceptability. If you are going to adjust the valves, try to adjust them to the highest clearance i.e. .15mm for the intake and .25mm for the exhaust. The biggest mistake most people make is adjusting to the tightest tolerance and then they wonder why they found tight valves and possibly burnt valves on the next valve clearance check. The reasoning behind this is that as the valve wear, they lose material from the valve seat face and the valve face due to erosion which causes the valve clearance to tighten up. I really wish the Service Manual was more clear on this point. They never tell you when repairing/replacing to return some aspect back to "as new" exactly what the ideal spec should be. This is where understanding basic fundamentals is essential if you're going to do your own maintenance. To be honest, even when i was being trained as an auto mechanic, this was never explained. it's only since working with engineers that I became more aware of the engineering aspects of mechanical equipment which has brought my understanding to a higher plain.
Thinking a bit, yes, be scared, me trying to think... If a feller had an engine that tends to run 'hot' perhaps it would be best to set exhaust at max clearance to allow maximum exhaust flow resulting in minimum head temps?
..and of course, 20 years later can't find my shim stack pile and shim tools. Sigh.
Please Log in or Create an account to join the conversation.
- biltonjim
-
- Offline
- Platinum Member
-

Less
More
- Posts: 953
- Thank you received: 246
1 year 9 months ago #31080
by biltonjim
Replied by biltonjim on topic Valve Clearance Check - 1979 KZ1300
Quote:
’If a feller had an engine that tends to run 'hot' perhaps it would be best to set exhaust at max clearance to allow maximum exhaust flow resulting in minimum head temps?’
I don’t think that stacks up, actually.
’If a feller had an engine that tends to run 'hot' perhaps it would be best to set exhaust at max clearance to allow maximum exhaust flow resulting in minimum head temps?’
I don’t think that stacks up, actually.
Please Log in or Create an account to join the conversation.
- Bucko
-
- Offline
- Platinum Member
-
Less
More
- Posts: 690
- Thank you received: 170
1 year 9 months ago - 1 year 9 months ago #31081
by Bucko
Hello from Canada's We(s)t coast.
Replied by Bucko on topic Valve Clearance Check - 1979 KZ1300
Ideally, it's the valves you want to stay as cool as possible so, setting the clearance to the looser end of the range will keep the valves on their seats longer.If a feller had an engine that tends to run 'hot' perhaps it would be best to set exhaust at max clearance to allow maximum exhaust flow resulting in minimum head temps?
Hello from Canada's We(s)t coast.
Last edit: 1 year 9 months ago by Bucko.
Please Log in or Create an account to join the conversation.
- Kawboy
-
- Offline
- Sustaining Member
-
Less
More
- Posts: 3127
- Thank you received: 1097
1 year 9 months ago #31082
by Kawboy
Replied by Kawboy on topic Valve Clearance Check - 1979 KZ1300
So nice to see other members chiming in and discussing issues. Kudos !!
I think the biggest issue with engines running hot is a perception based on gauge readings which are the direct result of the voltage in the engine temp gas gauge circuit. That circuit runs at around 7 volts and things like a bad ground(s) or a poor voltage regulator for the gauges could be at fault..
Then there is the thermostats and radiators Thermostats don't necessarily "just fail". They can stick and cause all kinds of weird readings. Radiators can get plugged tubes and have cold spots throughout affecting the return coolant temperature.
Ignition timing can also have a major effect on engine running temps. Too advanced timing by more than usually 8 degrees will allow more cylinder wall exposure to the flame front.
Engines running hot are another topic completely.
Please Log in or Create an account to join the conversation.
Time to create page: 0.198 seconds