
- Posts: 3243
- Thank you received: 1198
Swing arm pivot shaft removal tool
- Kawboy
-

- Offline
- Sustaining Member
-

Less
More
7 years 5 months ago #22686
by Kawboy
Replied by Kawboy on topic Swing arm pivot shaft removal tool
After cleaning the race and cup, lightly oil them and place the race in the cup. With your finger apply light pressure and turn the race in the cone and "Feel" if there's any spots where the race hesitates while turning. Bear in mind that this particular bearing set really doesn't rotate at all compared to the same race installed on a motor. And as far as weight on the race, it might be 100 lbs at the most since 90% or better is carried by the shocks loading on the rear axle. The only reason you might have to change it out would be due to rust if the seals leaked.
The following user(s) said Thank You: Daro, McBoney
Please Log in or Create an account to join the conversation.
- Daro
-
 Topic Author
- Offline
- Premium Member
-

Less
More
- Posts: 144
- Thank you received: 80
7 years 5 months ago #22700
by Daro
Replied by Daro on topic Swing arm pivot shaft removal tool
Thanks Kawboy, that's how i estimated the state of my bearing too. With no visible damage and the way the race turns in the seat of the bearing, with out any resistance throughout it must be ok.
Please Log in or Create an account to join the conversation.
- McBoney
-
- Offline
- Platinum Member
-

Less
More
- Posts: 561
- Thank you received: 87
6 years 5 months ago #25716
by McBoney
Six-Pot-Cafe in the making...
Replied by McBoney on topic Swing arm pivot shaft removal tool
Just managed to remove both pins in under 20 minutes using an even simpler tool (see pic).
No drama, but it was helped by the fact that the engine and driveshaft were removed, and that there apparently was little rust.
But I can tell the bearings are shot by simply looking at them!
Paul
No drama, but it was helped by the fact that the engine and driveshaft were removed, and that there apparently was little rust.
But I can tell the bearings are shot by simply looking at them!
Paul
Six-Pot-Cafe in the making...
Please Log in or Create an account to join the conversation.
- Kawboy
-
- Offline
- Sustaining Member
-
Less
More
- Posts: 3243
- Thank you received: 1198
1 year 1 month ago - 1 year 1 month ago #33679
by Kawboy
Replied by Kawboy on topic Swing arm pivot shaft removal tool
This topic has been dead for a while and rather than starting "another" duplicate topic on the subject, I found this one and thought I would add to it.
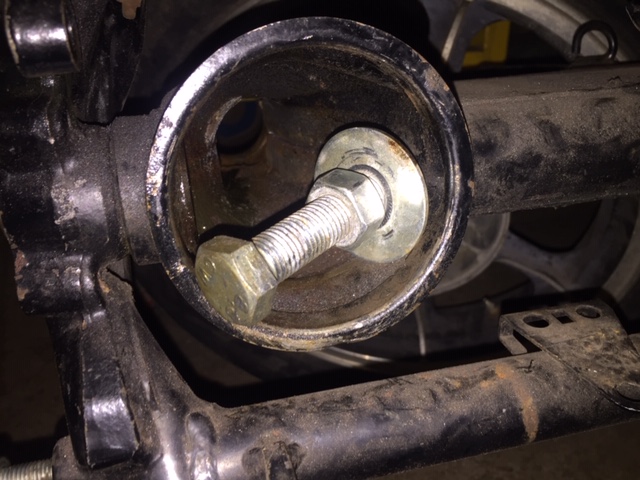
I needed to pull the swing arm to install the boot over the driveshaft coupling. Those pivot pins - !@#!#@$!@#$# seized just like everyone else's. Well I gave it my nuclear best. Penetrating oil for a couple of days, then heated with a butane torch and more penetrating oil. Made up a slide hammer from a 300mm length of high tensile 5mm threaded rod, washers and a chunk of brass for the hammer. Applied heat and sprayed the pin. Hammered away and ..... NOTHING.
It had been suggested that one should drill out the pin and tap for 8mm, then have a go with the slide hammer trick. I opted to modify the pin with the 8mm x 1.25mm thread and then I got a few items together-
8mm x 70mm grade 10.9 bolt
8mm x 60mm grade 10.9 bolt
8mm x 50mm grade 10.9 bolt
5 - 5/16" fender washers
10 - 8mm flat washers
Then using a 1-1/8" socket over the end of the pin bore, assembled the 70mm bolt with the 5 fender washers and 10 - 8mm flat washers and installed on the pin. This gave me 5 threads of engagement and left me with 5 threads of space in the pin. So I started to crank on the bolt and at first I thought I was pulling the threads out of the pin but in fact the pin was pulling out. SWEET !!
When I had turned in the bolt 5 threads I knew I had run out of depth in the pin, so I switched out the bolt for the 60mm bolt and again tightened down until I ran out of thread , then switched out to the 50 mm bolt and finished removing the pin
Pretty happy with the procedure and wished I had thought of it before wasting 2 weeks pissing around with the heat penetrating oil and the 5mm threaded rod.
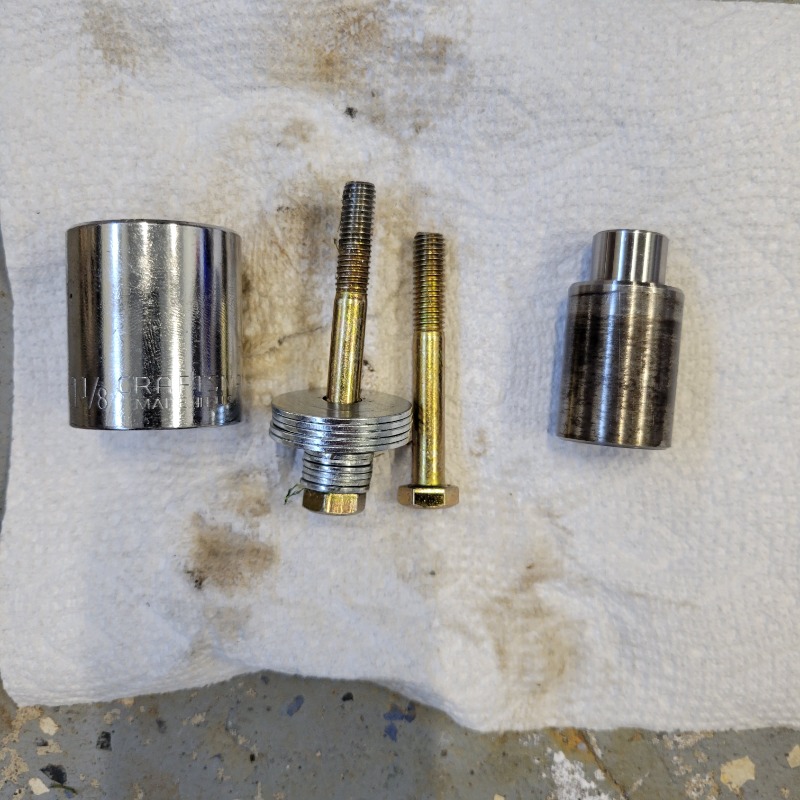
Pic of the "Assembly"
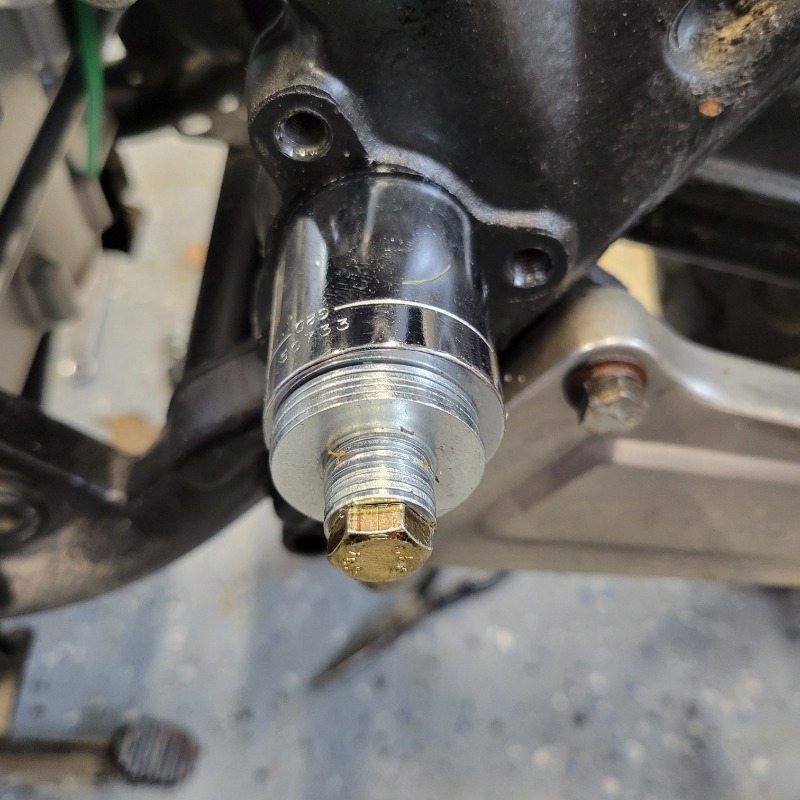
Tooling installed on pin. Ready to pull.
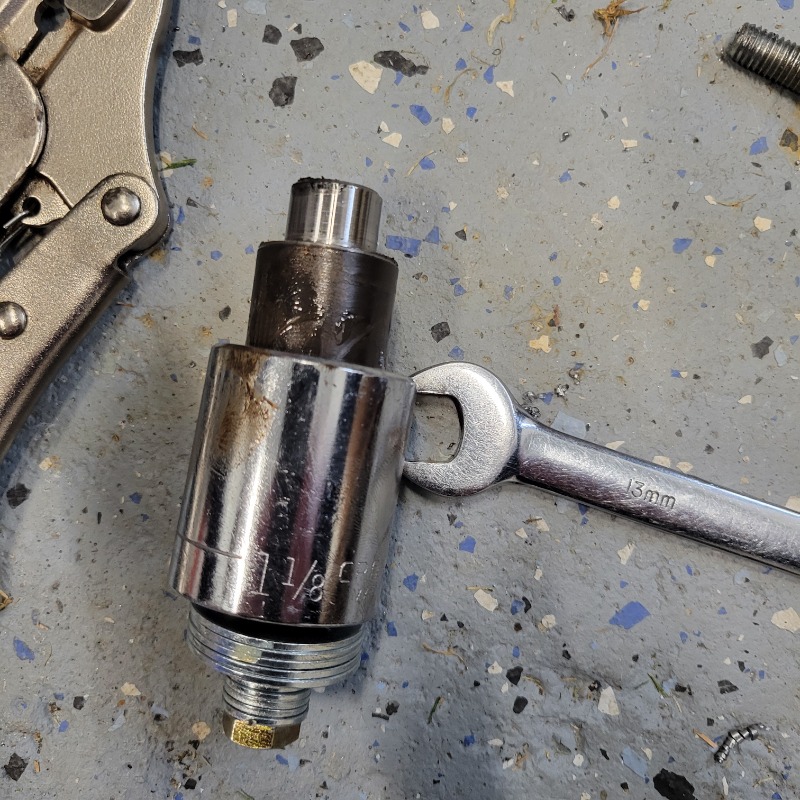
Pin pulled and still on the end of the tooling.
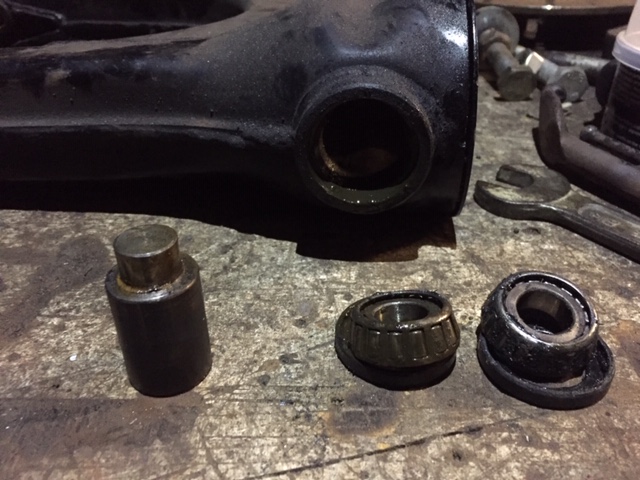
Now an interesting fact- Both pins came out covered in Graphite grease suggesting the previous owner had done the service work BUT Graphite grease is an absolute no-no when exposed to damp/wet conditions. EP2 grease is a more appropriate grease for these conditions.
I also found the tapered bearings in as new condition. Bonus. I will replaced the lip seals since I probably ruined them when I was applying the heat with the propane torch
I needed to pull the swing arm to install the boot over the driveshaft coupling. Those pivot pins - !@#!#@$!@#$# seized just like everyone else's. Well I gave it my nuclear best. Penetrating oil for a couple of days, then heated with a butane torch and more penetrating oil. Made up a slide hammer from a 300mm length of high tensile 5mm threaded rod, washers and a chunk of brass for the hammer. Applied heat and sprayed the pin. Hammered away and ..... NOTHING.
It had been suggested that one should drill out the pin and tap for 8mm, then have a go with the slide hammer trick. I opted to modify the pin with the 8mm x 1.25mm thread and then I got a few items together-
8mm x 70mm grade 10.9 bolt
8mm x 60mm grade 10.9 bolt
8mm x 50mm grade 10.9 bolt
5 - 5/16" fender washers
10 - 8mm flat washers
Then using a 1-1/8" socket over the end of the pin bore, assembled the 70mm bolt with the 5 fender washers and 10 - 8mm flat washers and installed on the pin. This gave me 5 threads of engagement and left me with 5 threads of space in the pin. So I started to crank on the bolt and at first I thought I was pulling the threads out of the pin but in fact the pin was pulling out. SWEET !!
When I had turned in the bolt 5 threads I knew I had run out of depth in the pin, so I switched out the bolt for the 60mm bolt and again tightened down until I ran out of thread , then switched out to the 50 mm bolt and finished removing the pin
Pretty happy with the procedure and wished I had thought of it before wasting 2 weeks pissing around with the heat penetrating oil and the 5mm threaded rod.
Pic of the "Assembly"
Tooling installed on pin. Ready to pull.
Pin pulled and still on the end of the tooling.
Now an interesting fact- Both pins came out covered in Graphite grease suggesting the previous owner had done the service work BUT Graphite grease is an absolute no-no when exposed to damp/wet conditions. EP2 grease is a more appropriate grease for these conditions.
I also found the tapered bearings in as new condition. Bonus. I will replaced the lip seals since I probably ruined them when I was applying the heat with the propane torch
Last edit: 1 year 1 month ago by Kawboy.
The following user(s) said Thank You: Bucko, stocktoy
Please Log in or Create an account to join the conversation.
Time to create page: 0.115 seconds